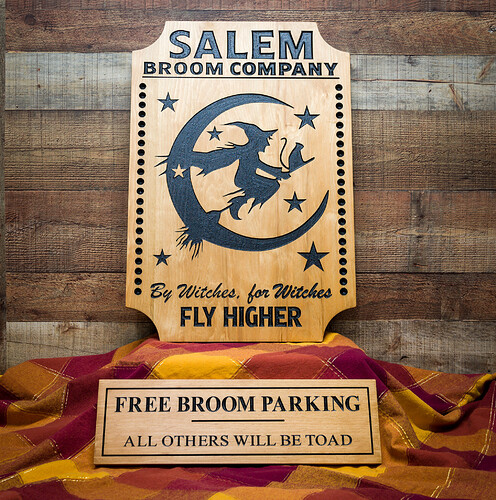
Here is our latest creation. A customer sent us a picture of a sign they wanted to have made and we recreated it using VCarve. This is a double sided sign which will hang outside their house on a post. The smaller sign will hang off the larger sign. This was a fun project and very pleased how it came out on the Onefinity CNC. Need to look at a drum sander to make it easier to ensure the sign if completely flat.
Awesome work! Nicely done replication of an image.
Very cool! Forgive me if this is a silly question, but did you hand paint the fill on the letters, or do you seal & paint the whole sign black after engraving and then run a finishing pass over the surface to bring back the natural wood?
For this style we carve first, then use some shellac to seal in the carved areas so then when we paint the carved areas black it doesn’t bleed outside the edges. After everything is dry we then sand the entire sign to remove any black paint that is outside the carved areas. Then we do the staining and apply any topcoat the customer might request. This got some water based spar urethane because it will be hung outside.
Eric,
ToolsToday also has a great video for building painted signs using Masking and paint on a CNC. Check it out as it saved a lot of time sanding and also lets you paint multiple colors. @CruversWorkshop might be a good trick for you too!
Thank you, that helps a lot! I appreciate you taking the time to describe your process.
Thanks Alex - I’ve seen that video before but forgot all about it. I’ll watch it again. I appreciate it!
Great work! Did you share this file, even as .jpg?
Tried to attach the SVG files, which shows as an acceptable type but doesn’t show. Here they are as pdf and dxf
SalemBroomCompany.dxf (1.4 MB) SalemBroomCompany.pdf (163.4 KB) SubSign.dxf (597.5 KB) SubSign.pdf (56.0 KB)
Thx much! Will try to convert - to be used in front of our barn
Thanks for sharing that Barry… Very cool!!
Love to see your final result!
Am on the road until 3rd week of oct so hope I can get it done quickly when I get back - will send you result if I get it done
Great Job, Its good to see final products and even better when you provide the methodology behind it. Thank you
Thanks for posting this… I just found it now after doing a search for sealing / painting techniques. So just to confirm… the paint never actually touches or penetrates into the wood. It basically sits on top of a layer or two of clear coat and a final coat or two is put over top of the paint? The paint is essentially sandwiched between the clear coats?
Hello Trevor, to be honest with you I posted that 4 years ago and I do remember the video but I don’t remember it in depth. That sounds about right but don’t quote me on that. I definitely know the technique works so follow the video and you should be good.
-Alex

