I have been busy with modifications and upgrades since my last post, and thought I would share an update. This post does not have the continued milling tests and rigidity testing that I had mentioned earlier, but I will get back to those soon.
I am also sharing this information since so many have purchased an Elite series CNC, or plan to upgrade. Even though these machines will come preconfigured and ready to go, my hope is that what follows will show just some of what this controller can also do. NOTE: The 1F Team has made it very clear over time that they will only support ‘stock’ configurations, so making changes or adding the functionality described below should keep this in mind.
In no particular order, here are the things that have kept me thinking and challenged:
New Z axis motor
One thing I had noticed with my ATC spindle (and higher pitch of the z axis ball screw - I have a pre-production Z20), is that upon system shut down the spindle would slowly, and occasionally lower. It was enough that it bothered me, especially if it happened with an expensive and delicate endmill still clamped. I searched for a Nema 23 high torque stepper motor with electric brake, and finally found one on AliExpress. It works perfectly. I tied the brake into my E stop circuit which is controlled by one of my Masso relay modules, so regardless of how power is removed, the motor holds position.
More tool holders and end mills
With my old set up, I had always wanted to have more ISO20 tool holders on my tool rack at all times, but the design of my retractable tool rack cover took up room. I removed the cover (see new design in next section below) and then had room for all 14 tool holders and my tool setter as well. I now have every tool I think I will need (mostly geared for aluminum milling right now) ready for the tool changer.
The tool rack is protected by a new plexi shield which remains permanently attached to the table, and I also gained a bit more cutting area at the back.
Pendant
I decided to add a pendant, but have other ideas to use - a programmable macro keypad - but that will shown and explained in a future video. Although Masso offers one for sale, I chose to purchase my own through Amazon to save some money, but also because I did not want the DB15 connector attached. I wired mine into terminal blocks under the front of my table, and then to my Masso G3 in my enclosure - it provides even greater reach. The benefit of the Masso pendant is that it can run off the Masso PSU (it can handle up to 24+VDC), whereas mine and most others have a handwheel encoder that can run on a maximum of 5+VDC. The Masso manual and that which came with my pendant provided all needed information, but you do need to be careful - and like to solder DB15 connectors ![]()
New chip containment methods
I need to say from the start that the next two changes/modifications are my attempts to avoid using a vacuum for chip evacuation, particularly because my main focus right now will be milling aluminum and plastics (so no fine wood dust).
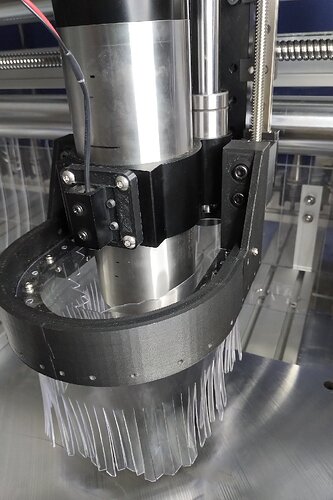
Having said that, To help contain chips I am experimenting with a clear nylon ‘curtain’ that I attached to the aluminum angle of my X axis energy chain guide. I cut 2 cm strips to make it flexible, in part so that it can ride over the plexi shield and tool holders/rack during automatic tool changes. I will see how well it works when I start my milling tests. My hope is that this curtain, as well as the plexi shield, will keep the tools at the back clear from most debris (there is an air blast as part of the tool change that takes care of any left over chips). That, and the dust shoe/shield design that surrounds the end mills during milling (see last section).
Pneumatic and motorized dust shoe
I am most excited about my prototypes for a dust shoe/shield solution.
My goals were 1) to have a fully automated retractable dust shoe that would not interfere with the automatic tool change routines, 2) to make use of the options made available from the Masso software and hardware, and 3) to have a dust shoe/shield that moved in synchronization with the height of the spindle/end mill, and lastly 4) I did not want my solution to be at all attached to the spindle body.
All my prototypes were designed using F360, and made from 3D printed parts, and parts purchased from Amazon. As these are still being tested, the final designs will change as I plan to mill them from aluminum.
The design below is for the pneumatic version. It will lower to one set point, but will also retract during an automatic tool change. It raises when the Y axis block triggers a sensor upon reaching the tool change area.
Here is also a short video showing its action: https://youtu.be/eQ7X8num2Ss
I just finished and installing the motorized version. This one I am most excited about because it does the same as the pneumatic version, but also will keep the height of the dust shoe/shield moving to match the end mill. This one makes use of the same sensor, but also Masso’s ‘toggled’ auxiliary inputs/outputs.
Here is a short video showing its functionality: https://youtu.be/1HjdcC2kS5g


