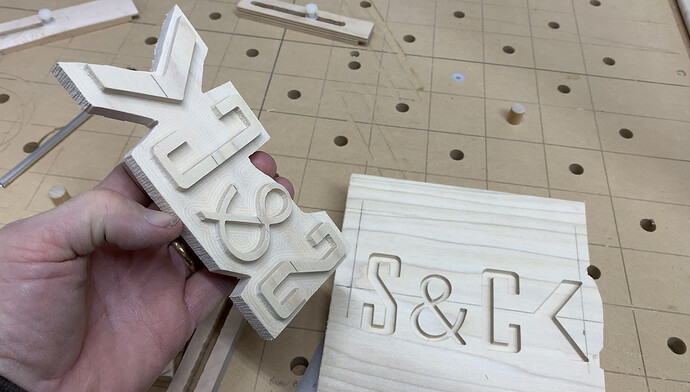
I’ve read all the very great advice from several authors on this site, without them I wouldn’t have even tried, plenty of learning experiences on this one. Shout out to @cyberreefguru @chips (really big thanks Chip) and Garrett Fromme, these guys have done so much to aide me. Looking forward to better documenting my process. Total disclosure, I broke down for an entry level subscription. This is my first official post so hope it works as intended. Of course on this board, any comments / critiques etc are always welcomed. I attached, the test run (that actually was close to working), the end result on the cutting board (that’s a very nerve wracking time btw) had just a couple of minor gaps but I worked out how to remediate that. My profile bit was the 1F classic the Skinny Jenny. Glad to answer any questions.
Looks great! Congratulations! I’m sure recipients will be very pleased.
That is very nice. I love these cutting boards that can actually be used!
BTW, nice effect from how you used the glue line at the very horizontal center line of the inlay.
I’m pretty new and I’m always amazed, dazzled and confused how you guys get such “squared off” corners with a round bit. What’s the secret?
V-bits ![]()
You’re right, you can’t get square corners with a round bit.
Sooooo, what’s the secret?
Simply use a square endmill! ![]()
Looks really nice Dale, good work!
Use a v-bit both in the pocket and in the inset piece. The v-bit will carve straight corners. Use the “Flat” setting (if you’re using VCarve/VCarve Pro) to get flat sections in between the edge. The slope of the sides helps lock the inlay into the pocket. You want to use a flat end mill as a clearance bit to do the bulk of the carving and the V-bit to clean up the edges. In VCarve there is an option to specify what the clearance bit or bits will be so you can start with a large one and work your way down. Typically a 1/4 and/or a 1/8 are sufficient. If you mirror the pocket to form the inset then the slope of the cut from the V-bit will mate perfectly with the slope on the insert piece.
Well, basically I did what I have seen repeatedly on this and other posts, broke out the notepad and iPhone calculator. Started out with what I wanted on the angles based on the bit I had. Didn’t really like that the smallest bit I had was the skinny Jenny but turned out that will be my go to now. The relief angle isn’t 2 1/2 degrees but actually 6 so I found my error on that with a very small gap, but on this board there wasn’t a “do-over” option. Glad to share the g-code if you want, or go into more detail. it is a very humbling learning experience, with several trials prior to success. The F360 settings, mainly the offset is key.
A small bit, a very small bit. Used a 1/16" on the inset, the inlay is just the opposite so inside corners become outside corners. Also used a ‘skinny jenny’ for the angled wall (6 degrees).
“The F360 settings…” Yeah, I’m def discovering how challenging that can be! Thanks, super helpful!
In everything I’ve read, it is the STL (stock to leave), pictured is the actual from the inlay final run.
5mm depth on the board and inlay. Difference being the board is exact on STL (0) and the inlay was 0.48 mm. As I mentioned I intend to increase this as I had the wrong angle for the calculations should have been 0.105 mm.
Head = spinning! Thanks. I’ve got a lot of ground to cover. I’ve only had my 1F up and running for a couple of days!


