yes, I agree, absolutely. That’s why I wrote this and this to help people to understand what the values on the control page mean and how you can enter them to (re-)create a certain machine state.
By the way, I found out here the other day that the offset values are not lost after a power outage or a machine shutdown. I found that they are recorded in the bbctrl log file and this file is still there after reboots or power outages, in fact it lives as long as the logrotate configuration lets them live, which is rather long.
Understood and I agree 100%. This process will be different for Onefinity Elite owners with the Masso controller and will start to highlight the differences and benefits.
This relies on the level of precision of the stall homing sequence, which in my testing could be +/- .2mm, and can be further impacted by dust build up on the rails and ballscrews. This might be good enough for many operations or might leave a noticeable line in a 3d carve. I implemented inductive proximity sensors for homing switches to mitigate these issues and I use the method you describe. I now run an aftermarket controller which allows me to have auto squaring, saved positions and macros.
I agree on over complicating. When I think I may need to re-acquire xyz, I don’t use the stock. I either model a 123 block and put my CAM xyz on a corner of it. Or, and much more usually, I don’t model it and manually set xyz based on the corner I probe.
This takes my homing accuracy out of the equation. It takes needing to preserve the top height out of the equation (when z is on the stock surface.) It all comes in to re-probing accuracy and the dimensions of my 123 block. It even lets me take the stock off the cnc to let epoxy cure.
A visual is much easier to explain. I’m on the couch watching tv with the Fam so no picture of a setup. Maybe tomorrow.
So I was experimenting again tonight. I’m not sure why but the machine was switching from metric to imperial during the carve. I did find that if it had switched to imperial without me noticing I couldn’t use the g0 code to move to my zero point. If I rehomed, it re-set to metric then I was able to make it move.
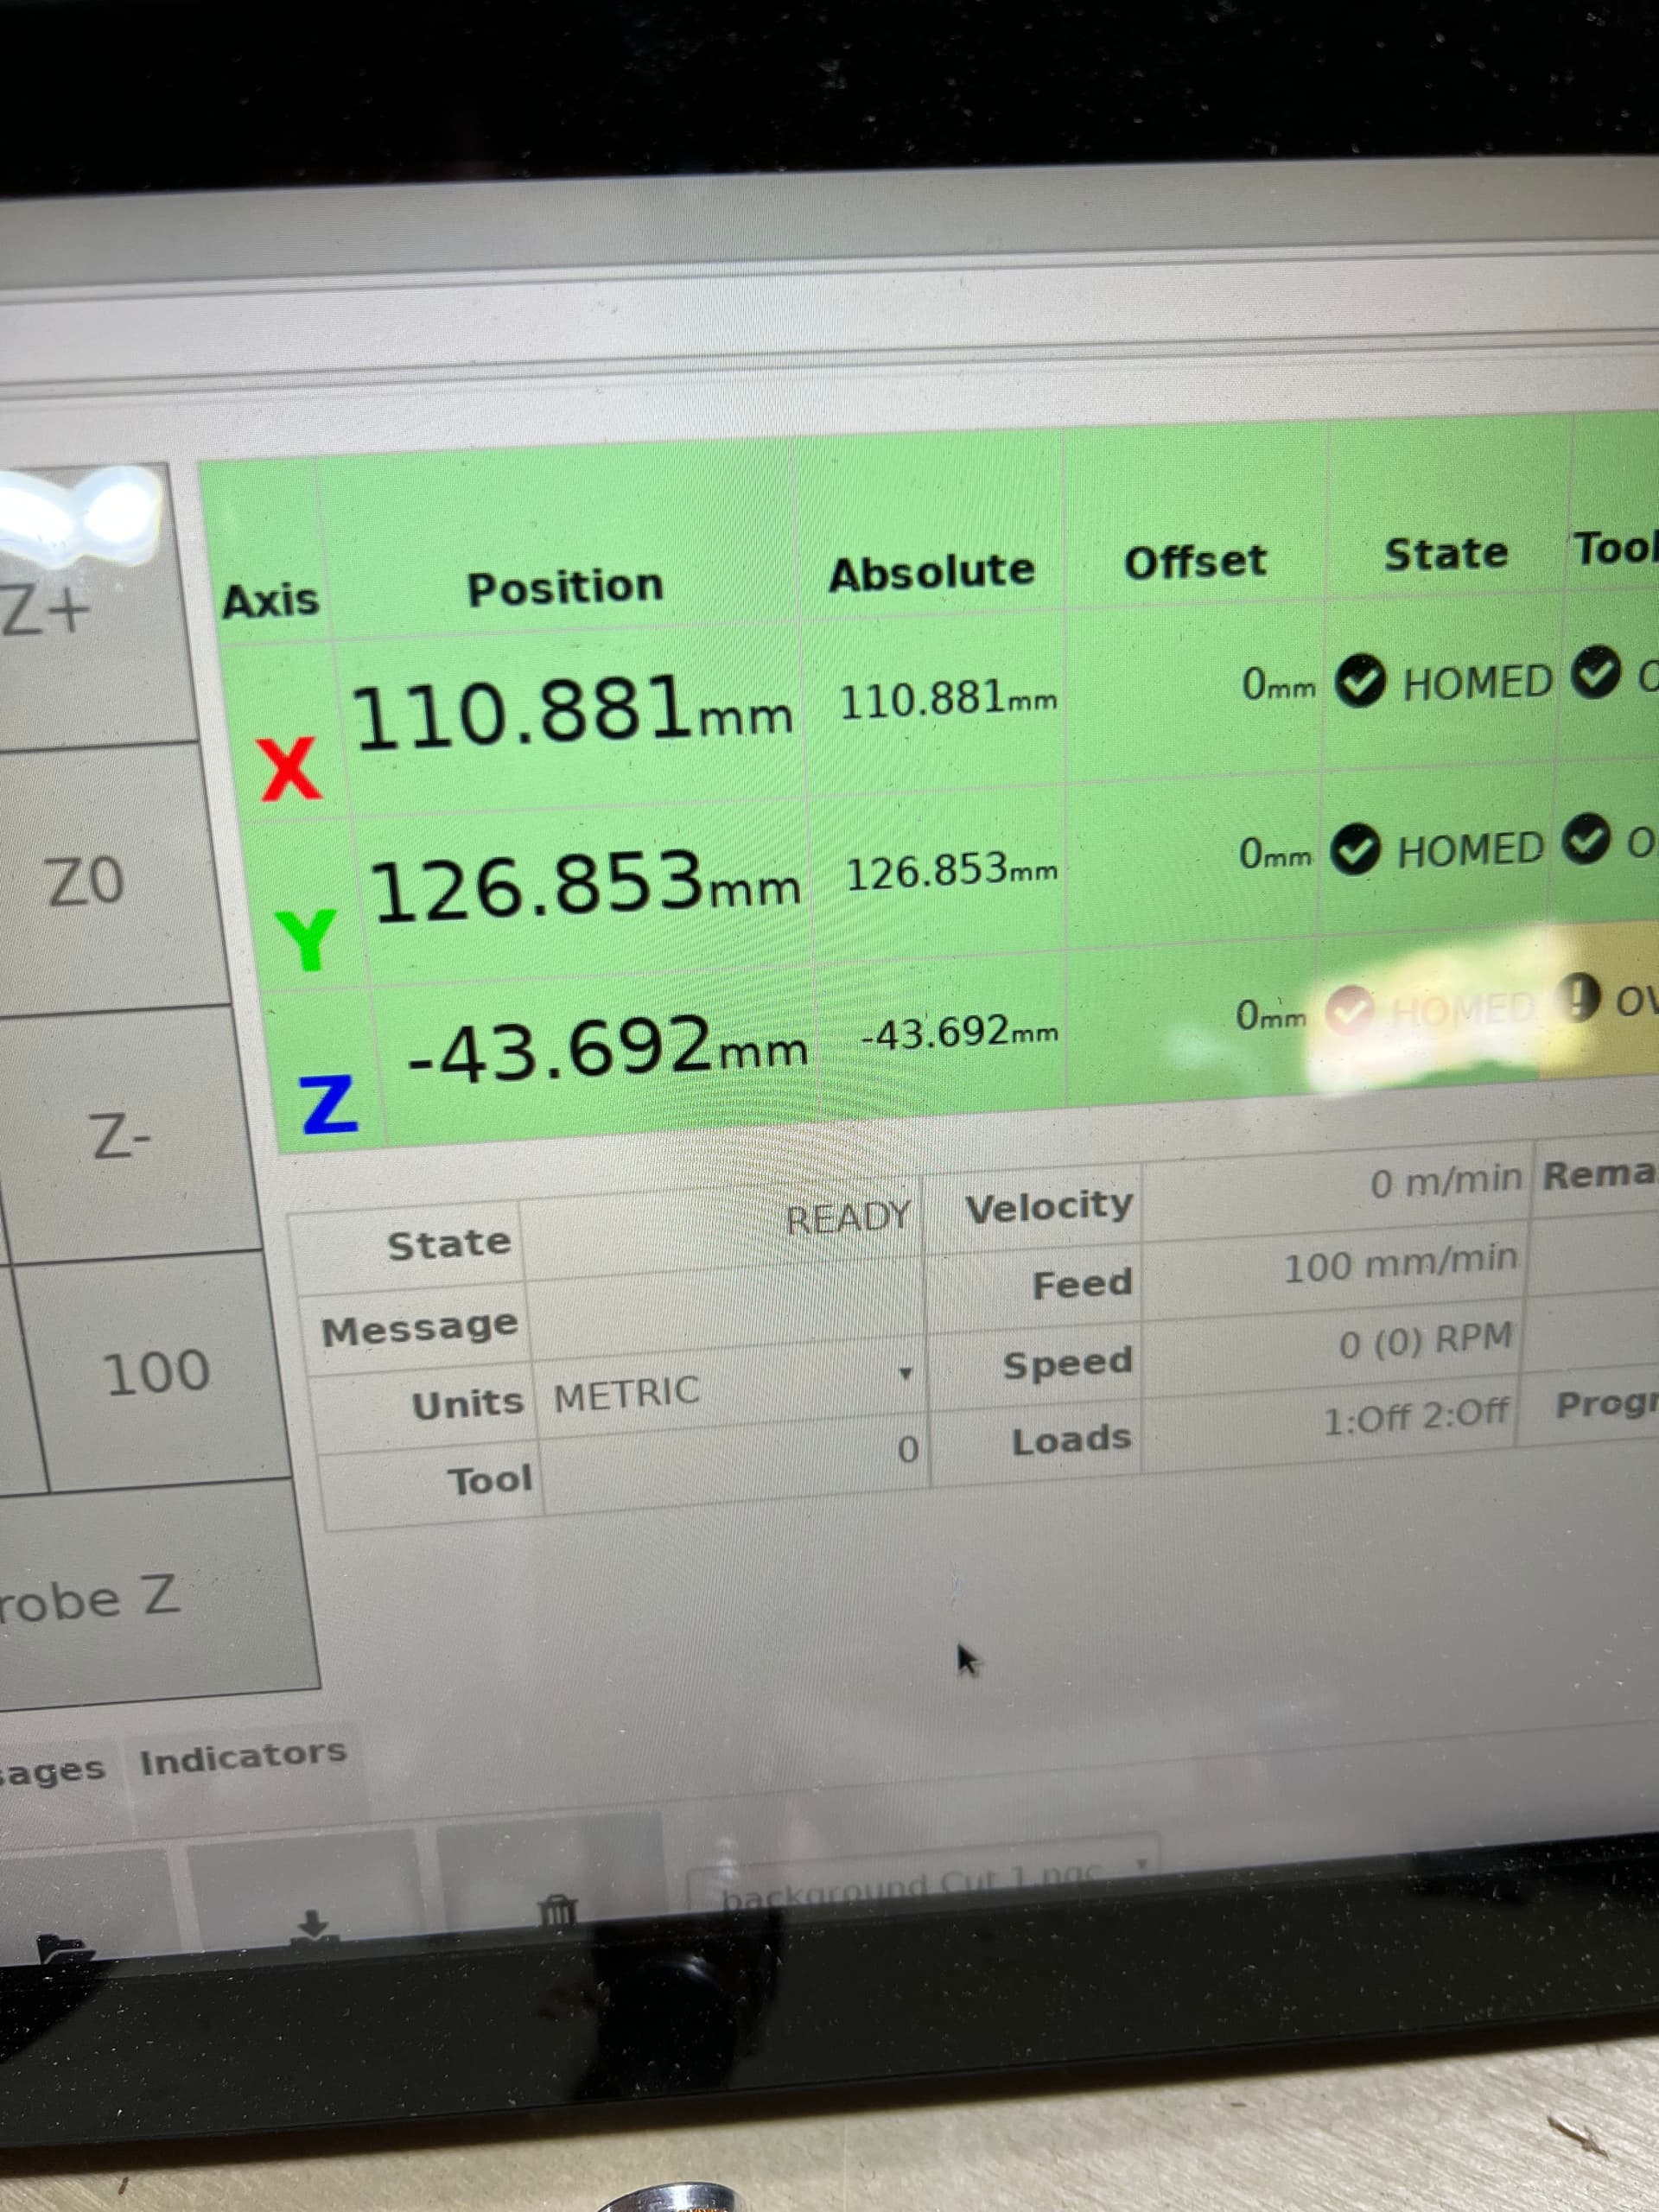
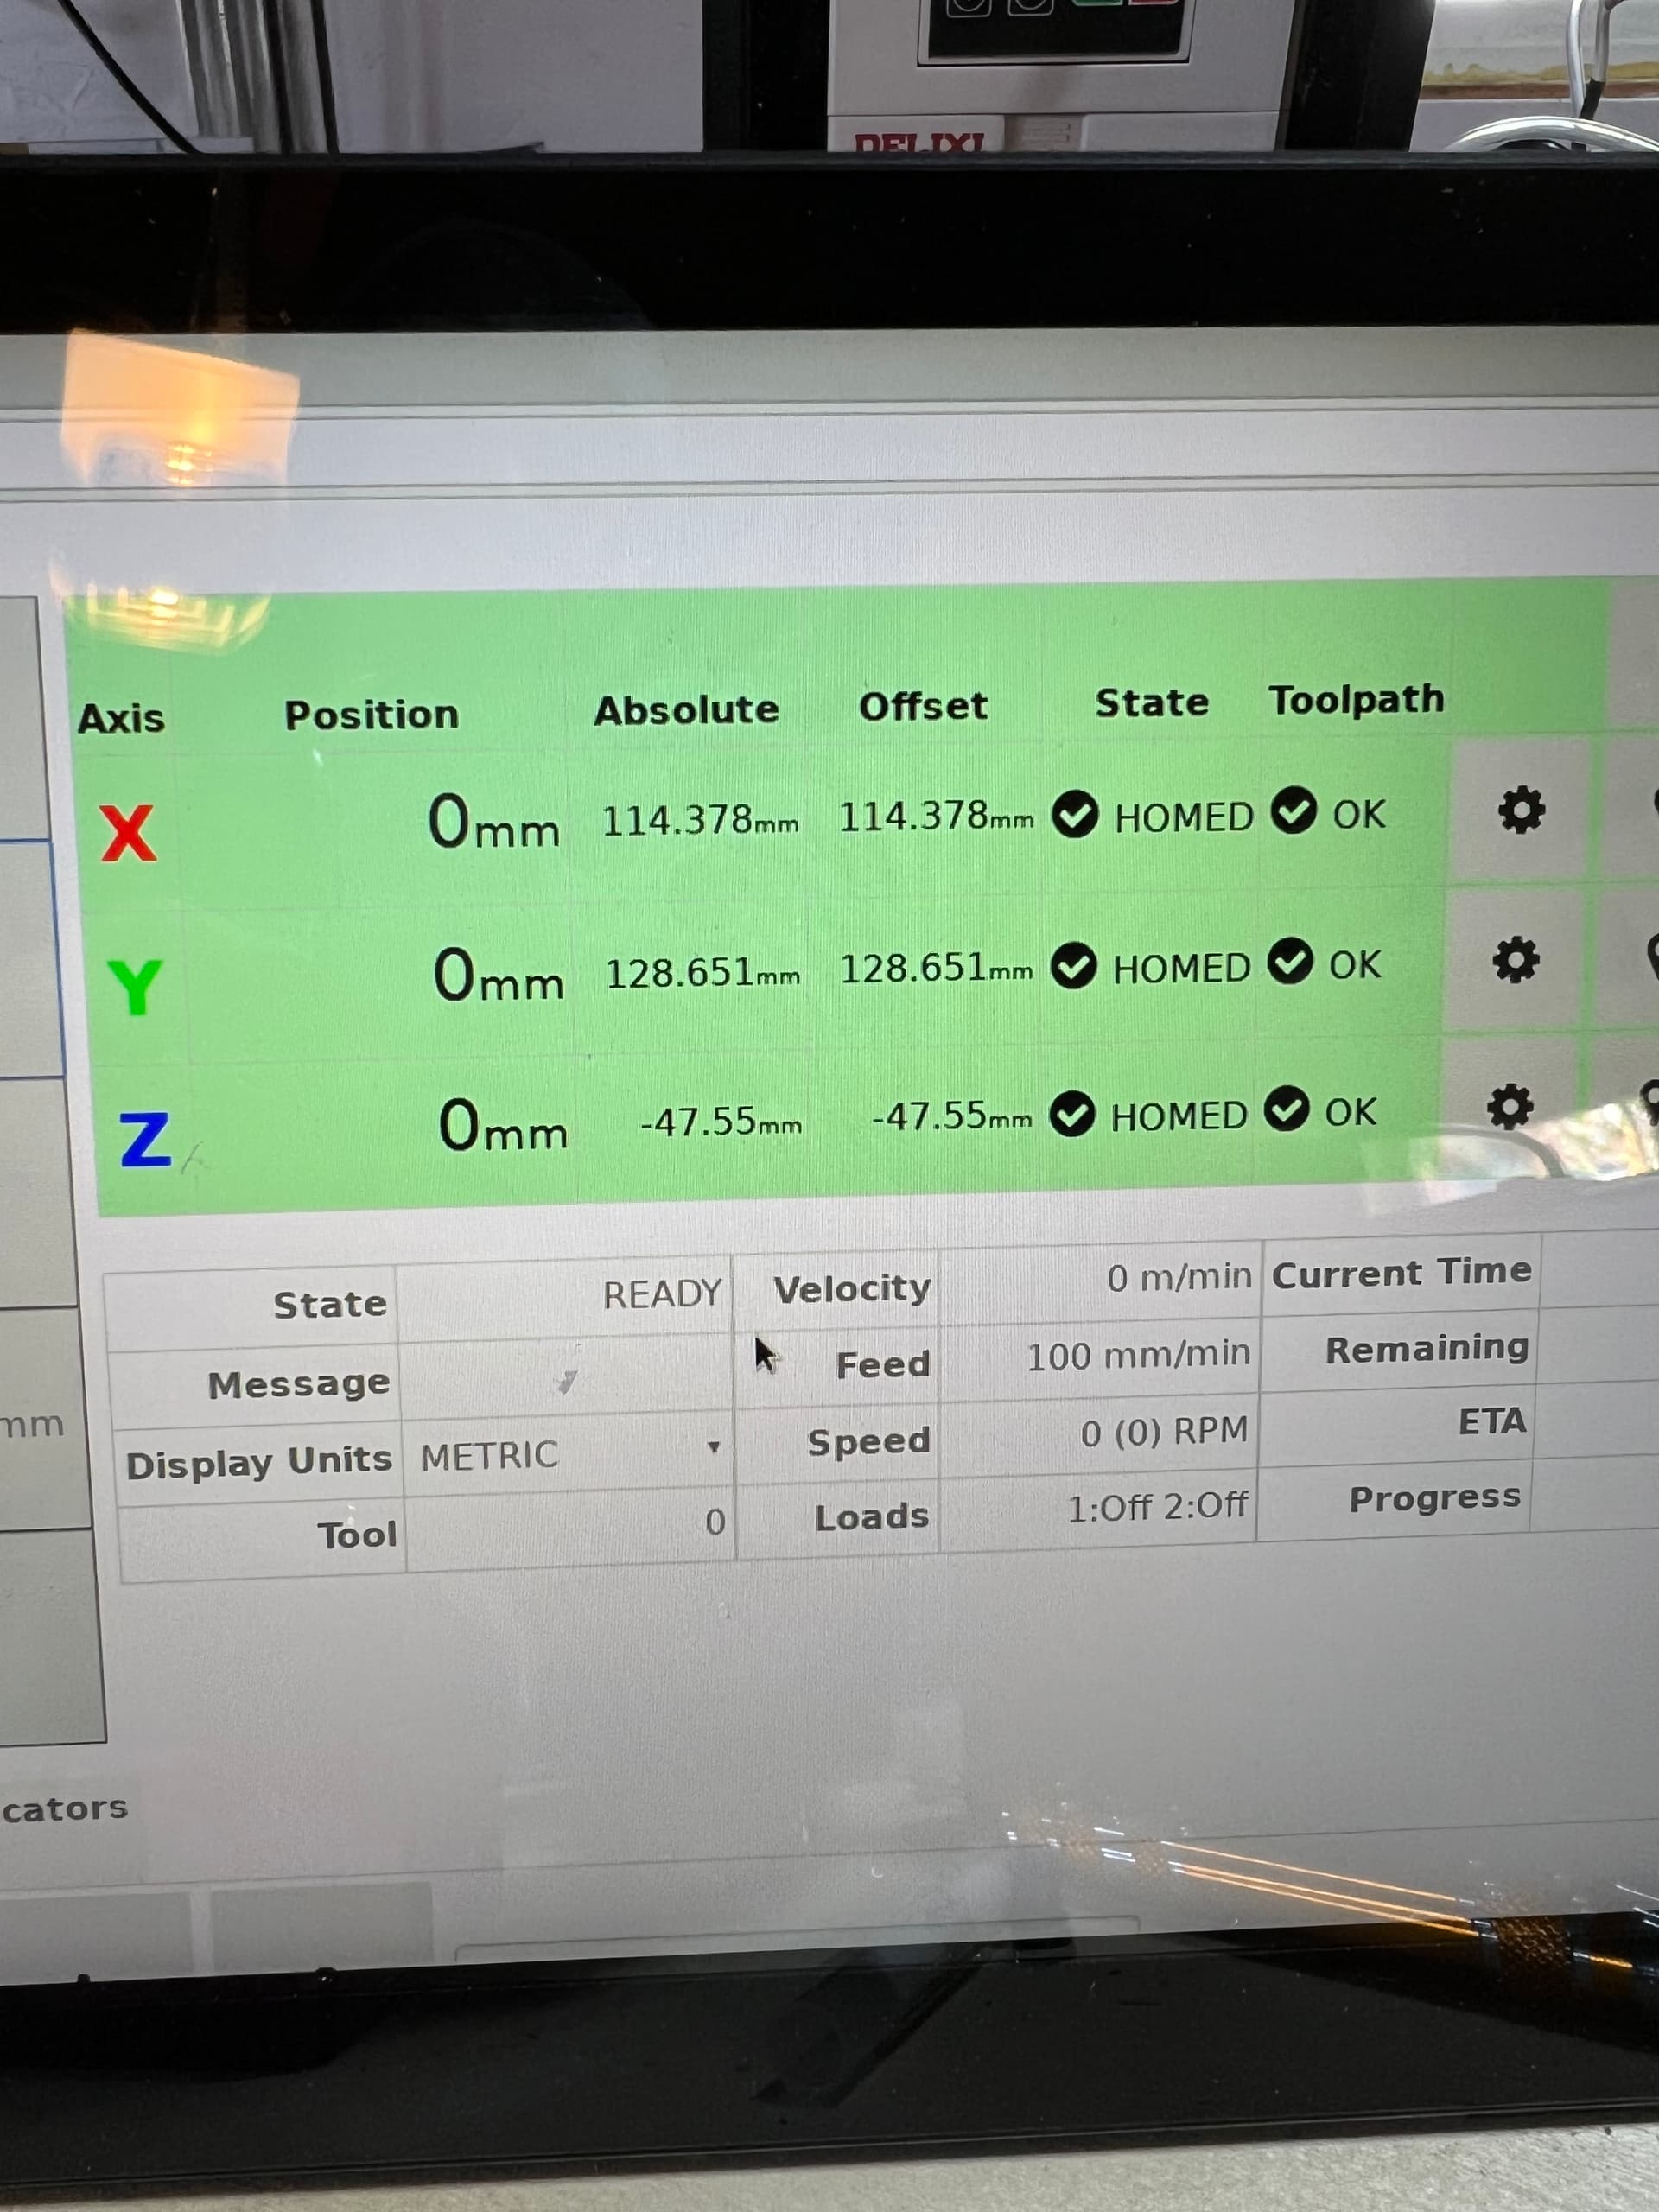
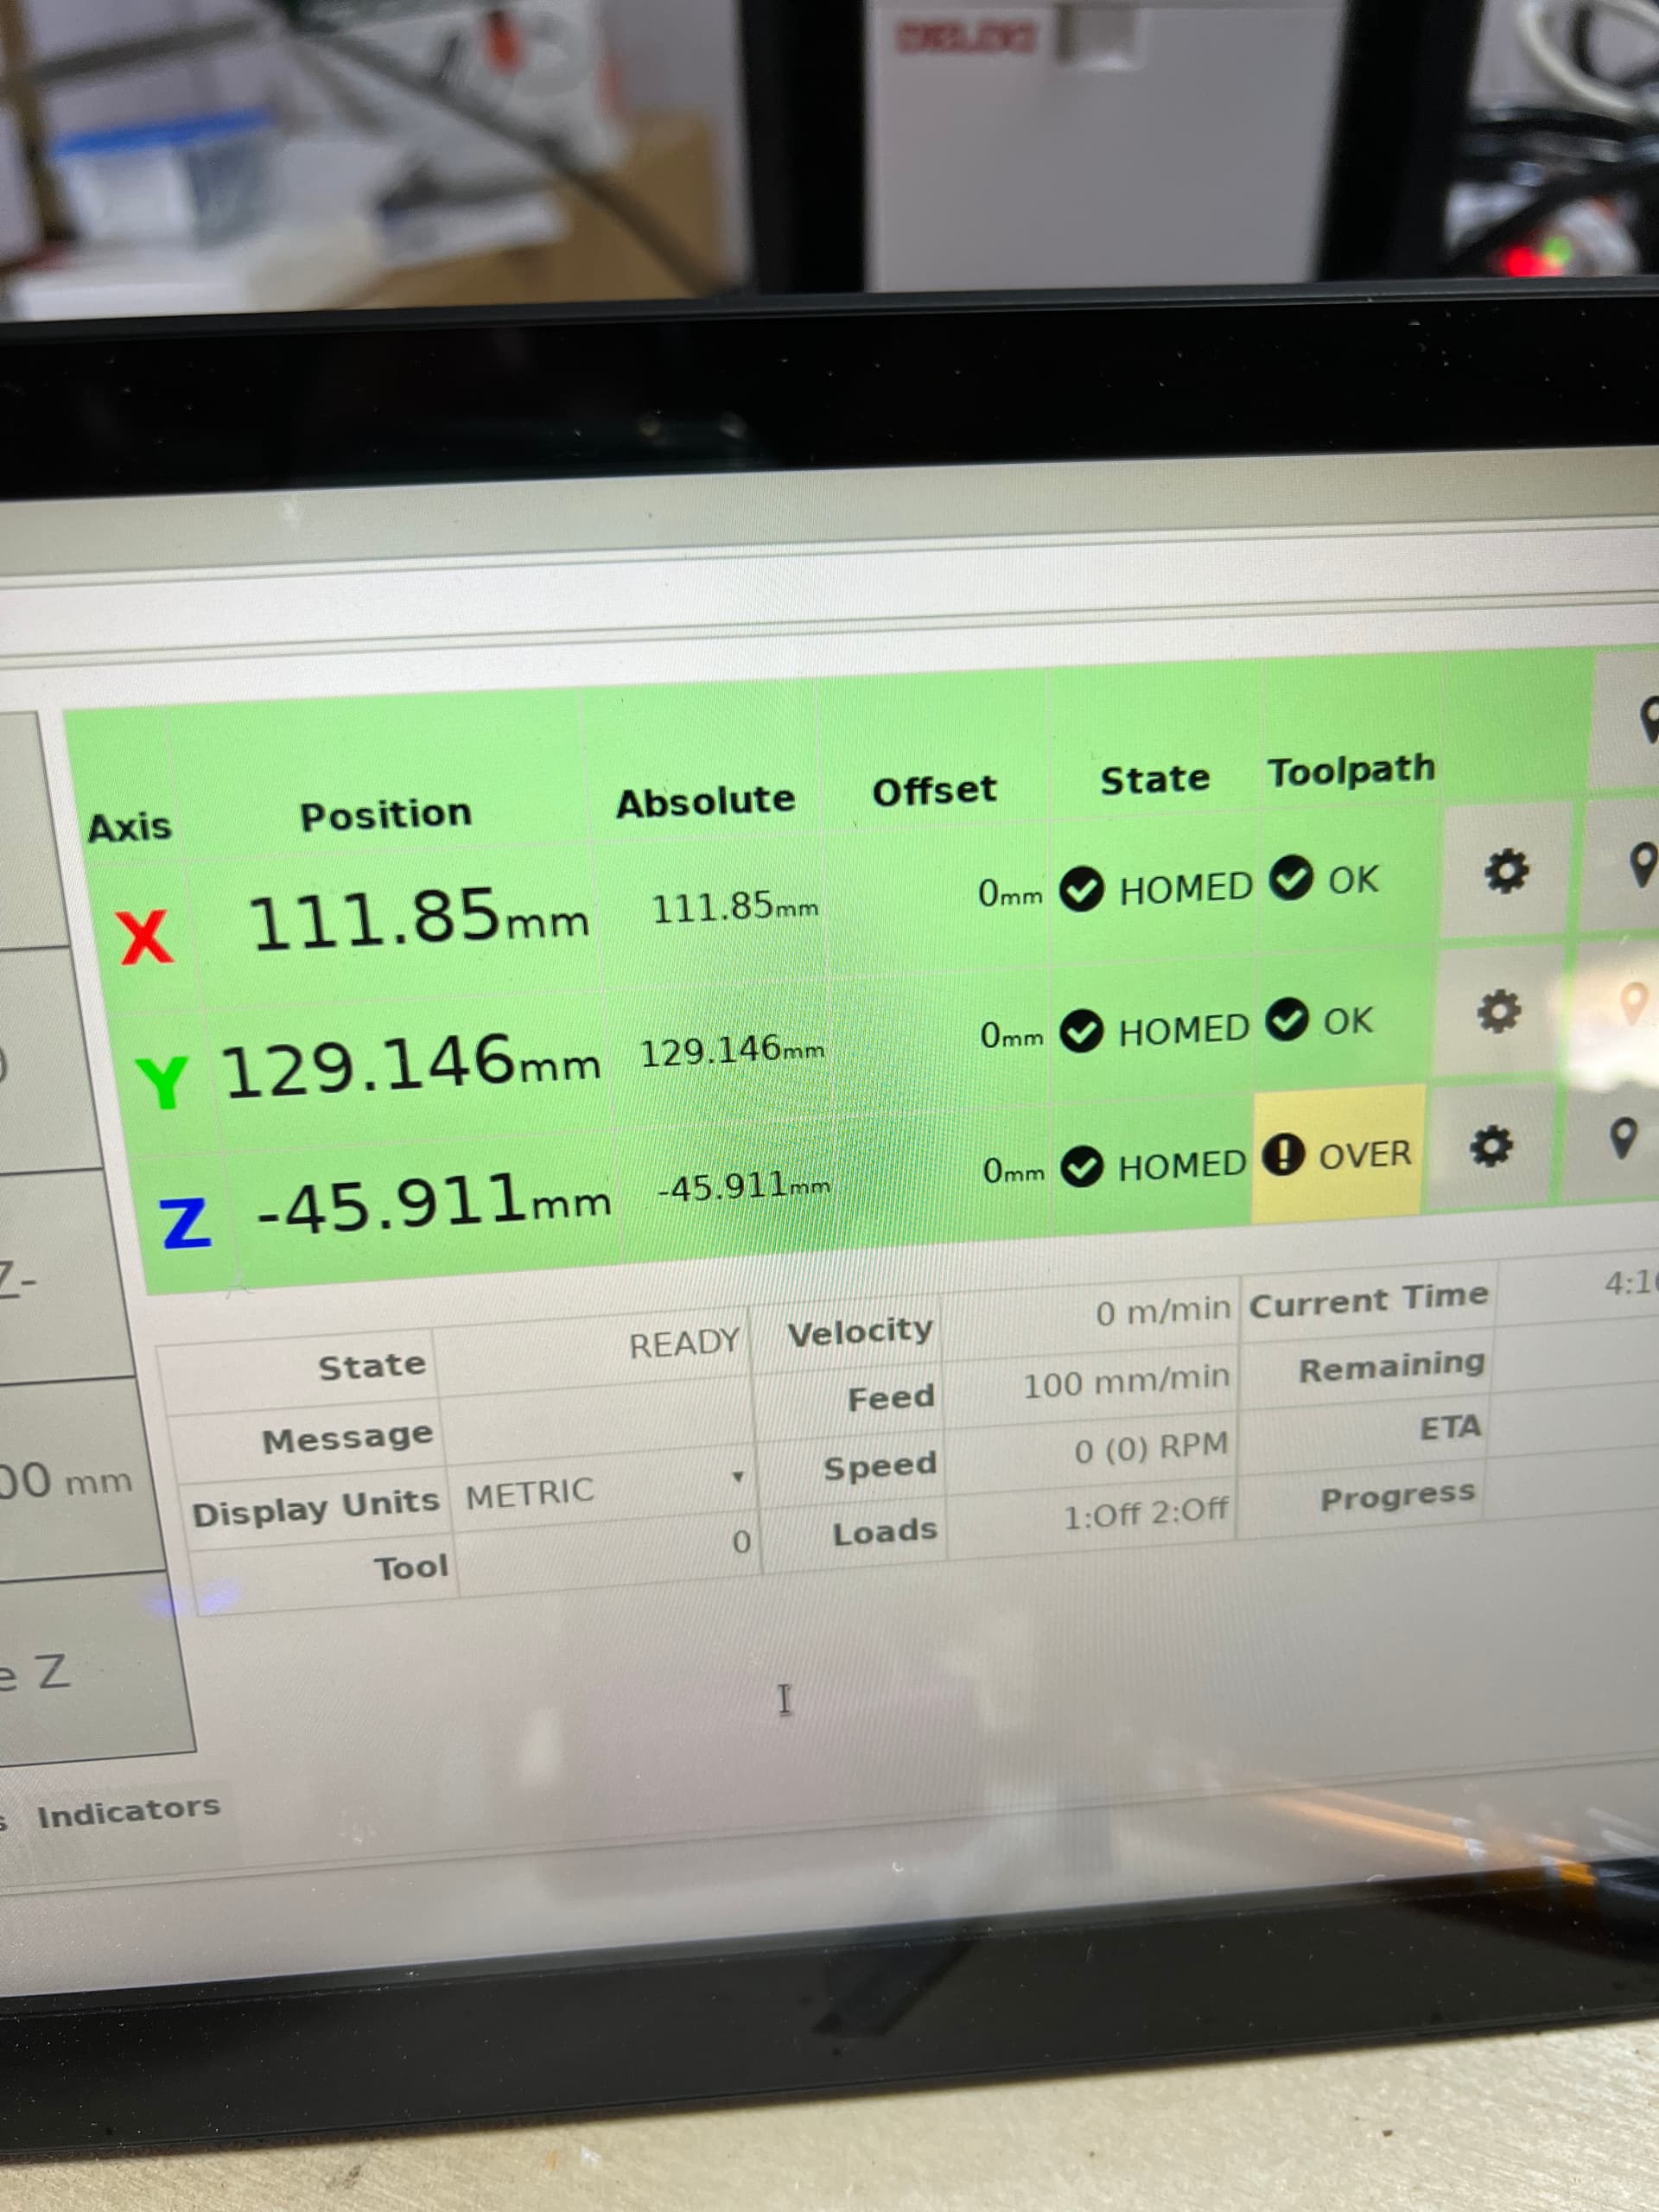
Unfortunately, another issue cropped up. I was finally able to get the machine to move with the g0 code but it wouldn’t go back to my 0,0 point. Below are pics of the x0,y0 that I set, then rehomed, the used MDI to go to the x,y that I had from the start. The problem is that it wouldn’t go to the correct home. The coordinates were correct on the screen but the true home (as in the home on my work piece) was 4mm away in both directions. I thought it might be a fluke so I tried again and same result.[
Full disclosure, I had to go back to 1.09 this weekend because my laser stopped working correctly with 1.2 update. I’m not sure if this would have happened with the updated firmware.
I am working on a job right now that will take about a week. Once it is done, I am going to update the firmware again. I’ll try the rehoming thing just to see if it works better this time. I may have to also work with 1F to figure out why the laser fouled up.
just by the photos, I can not follow what you did and therefore can not tell what the problem or the solution is. Also your description is not easily understandable. Could you please provide a step-by-step description of what you did (with numbers and actions you did) and what happened as a result, step by step. I need to be able to reproduce it here.
Can you also first say what the exact intention is of what you wanted to achieve.
But I got to go now, I will be back somewhen around 20:00 CET.
After turning on the machine and homing it, I find x0,y0 on my work piece(bottom left corner). I save those coordinates and rehome it(as if there was a power outage and I had to restart the machine). I enter the coordinates I saved in the midi tab using the g0 command. Assuming it didn’t switch over to imperial without me noticing, the machine will move the bit to the coordinates I just put in but they are not at the corner of my workpiece where I set them. I then move the bit back to the actual x0,yo (the corner of the workpiece in this case) and find that the machine made an error of 3-4mm. In other words, after all that it puts the bit in a spot that is 3-4mm off from the actual xo,yo that I set in the beginning.
Does that make more sense?
Dave,
It appears you are homing and then using the MDI to type in the offsets you took a picture of when you first setup your work. ( Correct me if that is not what you are doing )
Homing the machine does not put it back to the same exact place all the time. 3-4mm seems more than i would have expected - i have seen 1-2mm on my machine. In other words every time I home it could be 1-2mm off of where it was when i homed when I setup my work. For you it may be 3-4mm it depends on several factors on your machine. That is why I use a secondary block to reference my work to - not home - as I described several posts above.
I would only do that more involved type of setup when there is no more corner to use on the part.
I assume the same as everyone else. I secure the piece, put in an end mill bit and bring it to the edge. Hit home for x and y then use the paper method for z. I have a spindle and didn’t understand how to alter my equipment to use the touchprobe so I sold it. This method has worked quite well for me with the 1F and for the last 2 years with the Laguna CNC at my community woodshop.
Chris, that doesn’t make any sense. Homing, by definition, should bring the machine to the same place every time. The machine home doesn’t/shouldn’t change, only the workpiece home changes based on where you secure it on the spoilboard.
do you have a picture of the secondary block set-up? Right now I am getting around the issue as described above. I have a u-shape block (from Morgan’s spoil board files) set at a certain spot and I make sure that doesn’t move at all. I then place my workpieces for this epoxy project against that so I now I am in the same spot. I also try to bring the spindle head back to the material home before I shut it off so that it is in the correct position when I turn it back on. Since I can’t use the commands to reliably bring it to any place on the board I want, I make sure not to home the machine when I turn it back on. Once I finish this project and am ready to start a new one, I will let the machine rehome on start-up.
I wonder if the Masso system has these same issues?
Dave, That is the limitations of stall homing. I am sure you have seen that when the axis hit the stops when homing they jump back after they hit. The home is set to 0 after that jump back occurs. That jump back is one thing that is not consistent. Another thing is junk buildup between the axis blocks and the stop blocks. This is what I have observed, I am sure other will clarify if I am wrong on some points.
Here is one thread that discusses using limit switches to overcome these limitations. Can you add limit switches
I have not done this because 1. it adds complexity to the machine thus more things to fail 2. there are cheaper ways to get accuracy, however they take more time.
I won’t have time till the weekend to take pictures of my setup. But if you’re using fixtures already then you are well on the way. If you are taking your piece off for pours or whatever maybe you can rebump the fixture to get origin before you put the piece back on.
I assume you mean you press the zero button for these axes, not home. Okay, then you have the numbers. Do you have some example numbers after zeroing workpiece?
That would not have been necessary. With a (now earthed) spindle (in contrast to double-insulated hand router) you don’t need the magnet probe anymore. You only need one wire on the touch probe, because the spindle is already earthed. If the touch probe still did not work after switching to a spindle, all you would have had to do was swap the wires because some touch probes are wired the other way around (see here for details). The touch probe works perfectly with a spindle this way.
As Chris @ChrisM already mentioned above, using the 3-Axis Touch probe gives you more positioning repeatability than stall homing, either on a fixed block or jig, or at the workpiece itself.
Yes, I mean to zero. Either way all of the techniques people have mentioned so far just haven’t been consistent enough to get me close enough to my zero coordinates to be reliable in a multi-day carve. Especially when it is a customer’s logo or design, being off even 2mm is way to much. Maybe it’s just a limitation of the hardware. Maybe Masso will be better.
using the Three-axis Touch Probeinstead of inaccurate stall homing, either on a fixed block or jig, or on the workpiece itself, and subsequently only relying on the workpiece coordinates.
If I were in your place, I would order a Three-axis Touch Probe to be able to achieve much better positioning repeatability this way.
We will have to agree to disagree on the probe for the moment. Even when I had the Makita, the probe wasn’t accurate or repeatable. X and Y were OK most, but not all of the time. Also, with the Spoilboard and clamp system I got from Morgan’s etsy shop, you can’t easily use the probe with the u-clamps in place. They get in the way. so you have to try to probe x/y before securely clamping it then hope you don’t move it.
At least 25% of the time it would try to jam the bit through the probe when doing Z. Broke 2 bits that way. I sent a question to 1F about it but didn’t get a response. To be fair, it was buried in an email with a few other issues trying to get it set up. Anyway, I’ve moved on at this point.
what @ChrisM suggested above, is to clamp a block somewhere on your workarea, that can be left permanently there, away from your work, and to use the touch probe on this block in order to substitute homing with a more reliable method. Unlike when using stall homing, this block never moves and repeatability should be excellent.
Regarding problems when using the touch probe, you should be able to eliminate them by taking care to clean the bit and the inside of the collet before probing so the electrical connection is of good quality, or if errors come from the flutes, even better use the shank of a bit that you inserted the other way around into the collet as the probe to probe X and Y (and use the real bit only to probe Z).
If you had such problems there could also have been a problem with the probe wire. I would not give up that fast, since when everything is in order, the Touch probe brings excellent results.