One of the reasons I desire to get the Onefinity is for laser engraving and/or CNC engraving custom clocks faces. This is an image of everything to scale of the 3 sizes of clocks I am thinking about in relation to the working area of the Onefinity . I think the 3 face and four face clocks can work 3 at a time if I come up with an alignment jig. But would I have enough space to clamp 6 of the 2 face clocks? I do not know how much space is needed to clamp items.

When doing something like this, you’re usually better off to develop specific clamps for your workpieces that will maximize workspace layout. Off-the-shelf generic clamps would probably be fine for clamping a single row of clock faces, but it you really want to fill up the work area, you will need to develop something more space-saving. It’s difficult to answer your specific question of “how much clamping space is needed”. That’s entirely dependent on how you have your wasteboard set up and what you develop for clamping.
If I had to do a lot of these I would just screw the blanks to the spoil board. Include the hold down screw locations in your toolpath to ensure you avoid them when doing the work path. Make a template to predrill the holes on a drill press would probably be quicker. Probably better to use threaded inserts in the spoil-board.
Still reading about what type of waste board setups there are, I seen T-tracks, solid boards with holes and holes with screw mounts in them, solid boards that folks screw their wood to (not a fan of that), painters tape and super glue (not sure how reliable that is), not seen a vacuum system yet but not sure my garage can power a CNC, pc, dust collection and a vacuum board setup. Am I missing any?
Yes the holes will be done on my drill press, I have not learned to use my hand held router or table router (table not assembled either) yet. I was thinking the CNC could do that part.
(Images from How to Make a DIY Wooden Clock | Easy Home Decor Tutorial for examples of what Pocket I meant. No connection to the type of Clock I want to learn but the mechanism is similar).


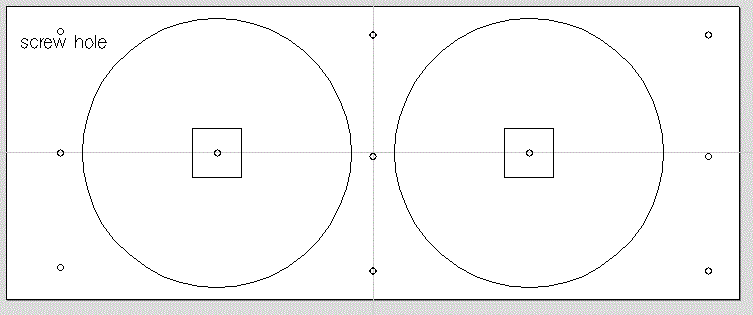
I was thinking of something like this. Use cnc to make pilot holes where mounting screws go. Drill these on drill press. Screw workpiece to spoilboard. Use cnc to mill the pocket for the movement and the center hole. Flip the workpiece over and carve/laser the clock face.
Ok how do I fill in the screw holes to where they are unseen for the finished product? The samples in my original image are the whole clock and drilling holes in their surface does not seem lit a quality product. Again sorry I am a very beginner wood worker with a lot to learn!
Current actual product using vinyl cut on a Silhouette Cameo vinyl cutter.

What if you added extra material all around the edge then use @ShamRocker 's idea and put the screws in that perimeter material, then cut out the finished rectangle as a last step. You would not be able to put a screw in the middle with this method, but perhaps a tape/CA glue strip down the middle would take care of that. you could limit waste by choosing overall rectangle size carefully.
2 Likes
Oh, I misunderstood. I didn’t realise there were multiple clock faces in a rectangle. I thought they were going to be cutout.
No worries, I did not explain well enough but thank you for your input.