How can I place my Zero Z on my wasteboard? I did succed to place my HOME Zero for X,Y and Z But when I trie to place the zero on my waste board, the Zero is allways ‘‘UNDER’’. I watch the tutorials but still cant fix the problems. Does my rooter is well instaled? Heres is some pictures…
The “under” warning is in relationship to the program you have loaded. Have you loaded a new program, set your X,Y,and Z origins and are still getting the error?
When you home your machine you are creating a machine “home” or origin. When you set X, Y and Z zero you are creating a workpiece “home” or origin which is some offset from the machine origin.
Your programs created in CAM also have an origin (front left corner and top center are common locations, but technically it can be anywhere). The origin created by your CAM program and the workpiece origin should always be in the same place on your stock (front-left-top for example).
The “Z Under” warning is saying that when your program runs it will try to go below the absolute limit of the machine. In my experience this is most often caused by a mismatched workpiece origin.
For example, you have a piece of 18mm thick stock secured to the waste board. You set X zero at the left side of the stock, you set Y zero at the front of the stock, and you set Z zero at the waste board surface. However, in CAM the Z zero point was at the top of the stock! From the Onefinity’s point of view, your stock is in the same X and Y location but is 18mm down inside the waste board.
Most users would zero off the workpiece, but you can use the table surface to set your zero. It depends on your where you placed your starting point in whatever software you are using. It needs to be in the same place. Once you have zeroed just set your z-axis on the screen to zero and away you go.
As a newbie, you may not have set your workpiece zeros/origins (if you don’t have a probe, do it eye) yet.
Once you set your workpiece and you still get the error, then you’re trying to route lower than CNC can go. The machine doesn’t get it wrong: check your CAM programme stock coordinate system vs where you are setting working piece home position. Or you are trying to route lower than the machine can do.
I see from the picture that your router can be lowered in the mount more to help reach the wasteboard. Also, it looks like you can lower the Z axis to the last hole which will allow you to reach the wasteboard before the Z axis will bottom out. This should help with the under warnings.
1 Thank you very much. Ok so, to be sur I understand, The Homed position is the position of the machine. It is determined by the machine, When I press homed, the X goes to max left,Y goes to max front left and the Z goes max Up position.
2- I place my piece of wood (stock. exemple: 200mmx200mmx25mm) somewhere on my waste board
3- In my program, the cad part is draw from zero. But i pick front left top for the origin.
4-Now on the machine I do the zero. So I place the X and Y on the top corner of the piece of wood, but for the Z, I place it on the waste board surface.
I hope I understand thank you very much
but for the Z, I place it on the waste board surface.
The Z zero locations should match. So if you pick the top left front corner in the software, you should also pick the top left front corner on your stock.
I will try another way
Homing your machine establishes the work envelop of 819mmx819mmx133mm.
Zeroing establishes your work piece and g-code in relationship to that homed envelop.
It is critical that you zero you workpiece in the same location as your drawing (datum) which establishes the g-code
I hope this helps
Dave
I’ve read and re-read the comments on Z-axis warnings, and I get the concept (I think) I just can’t find my error.
Using a V-carve bit with single flute so (for the first time) I can’t get X,Y and Z all with one probe session (won’t find X,Y correctly). Yesterday I tried it anyway, and got a Z “under” warning. Instead of looking for an intelligent solution, I just raised the spindle in its mounting by a little more than the stated error, and the probe found the correct 0 position (for Z).
Today, I changed only the bit type in the toolpath (two single flute cutters, differ only in tip width by 0.005"). Confirmed the “0” position is still front left corner of the workpiece (surface). The workpiece is a sheet of brass mounted on an 18mm piece of sacrificial MDF. I set X,Y by eye, then used the program to seek Z (probe plate upside down on the workpiece). It complained of being 8.6 mm (over) Same thing twice, so I moved the spindle back down by half of the prior day’s change, but on repeat, got the same warning and same distance (8.6 mm). Went back to the file, confirmed the 0 position is workpiece surface.


 I will try this.
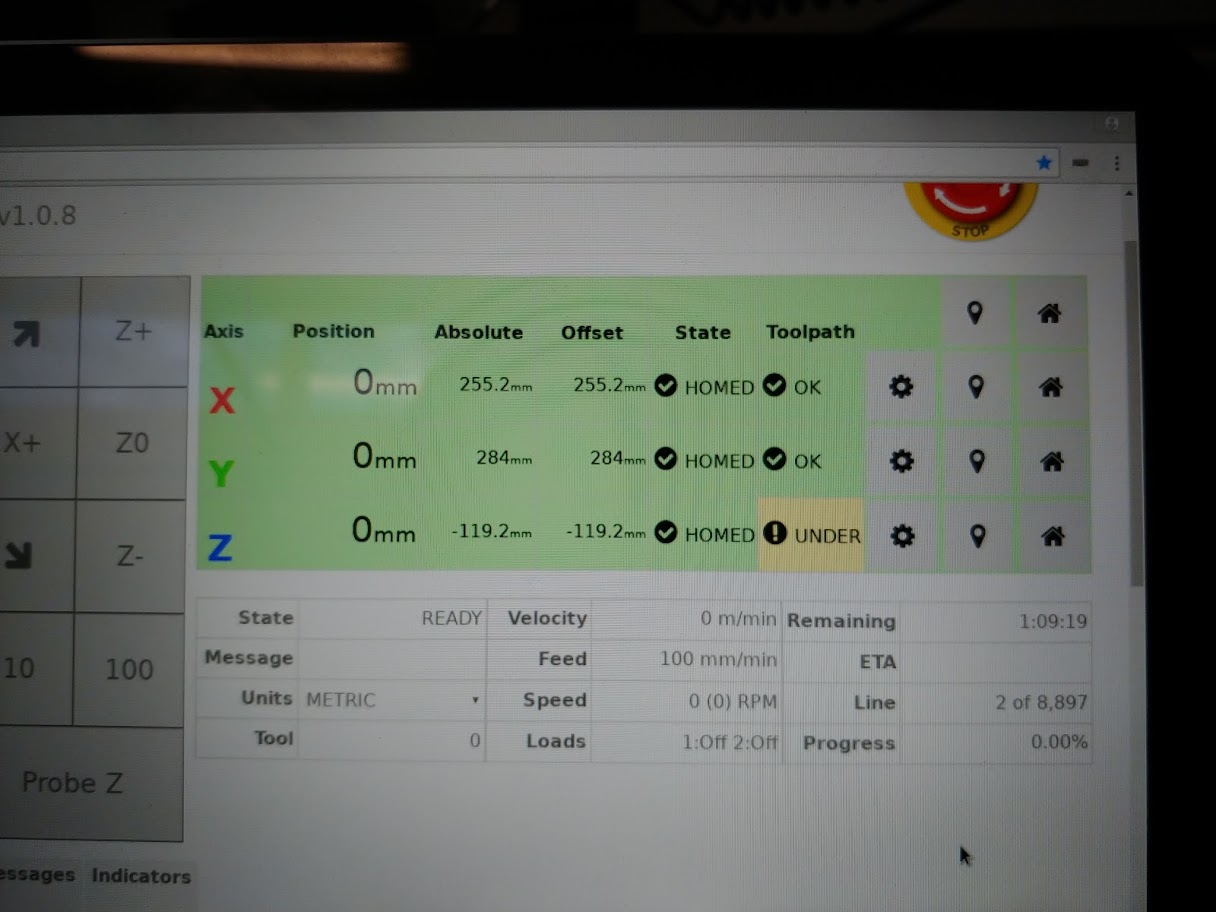