I just got my OneFinity CNC a couple months ago and am planning to use it to cut mortises for mortise and tenon joints. Hoping to set aside my mortising machine since I imagine the CNC will do a much nicer job (minus round corners). Anyway, I was thinking about how to best lay things out to simplify setup. The first thing I realized is when you are doing legs and rails for a table is that the legs might not be square, the rails on the front, sides, and back might be different heights, and you typically need to reference the outside edge when locating the mortise. This became a bit of an issue since I don’t know how to use a touch probe for anything except the lower left corner.
If all the legs are square, and all of the rails are the same, then the problem is much easier. But I wanted a more general solution that would work for almost any situation. The following is what I came up with. Hopefully people will find it beneficial.
Here is the generalized layout where the front and back legs might have different dimensions and they might not be square.

Furthermore, if the front, back, and side rails are different heights the mortise joints will also have different lengths.

Since the back mortises will be the same, the side mortises will be the same, and the front mortises will be the same, we can treat them as pairs and machine each pair at the same time.
Start by placing one leg on your CNC. Since the legs are likely longer than 16 inches you will need to align them with the Y axis. Start by placing one leg on the table and locate the lower left corner using a touch probe. (Note location of mortise)
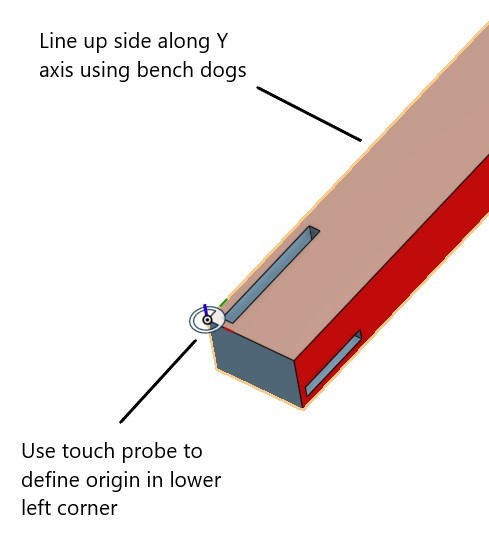
Now place the opposing leg on the table. Line it up with the other leg using bench dogs and then but them end to end.

You will do this same procedure for each pair of mortise joints. You will do it twice for the side mortises.
The layout in VCarve is fairly simple. I assume other software will be similar.
a) Define your material to represents your table leg.
b) Create a rectangle to represent the rail. Notice the slight offset from the edge.
c) Create a rectangle to represent the mortise. Centered on the rail left to right. I like to leave a 1/4" shoulder
d) Create a line along the bottom of the material that will be used to mirror the mortise
e) Create a mirror copy of the mortise

If you have different size legs and different size mortises you can create separate layers and mortises for the front, back, and sides.

Finally, create your pocket tool paths for your different mortises. Again, if your legs are square and all of your rails are the same size then you will just need one pair of pocket tool paths.

Hopefully a few people will find this helpful. If someone has a better solution, please share it.
Blessings!
Rex

