CNC platform / table / enclosure

Order the Onefinity: check!
Know where to put it: … uhhh…?

My current workshop is tiny (perhaps 10 sqm), so I spend just about as much time playing Tetris with 2x4s as actually operating my tools. Throw in a Onefinity Woodworker with a footprint of about 1.8 sqm, and things are starting to become interesting. But even if I had a large shed, I’d still wish to keep my work stations compact.

So now I’m thinking about how to make the most efficient use of my workspace, without compromising comfortable usage of tools. My current idea:

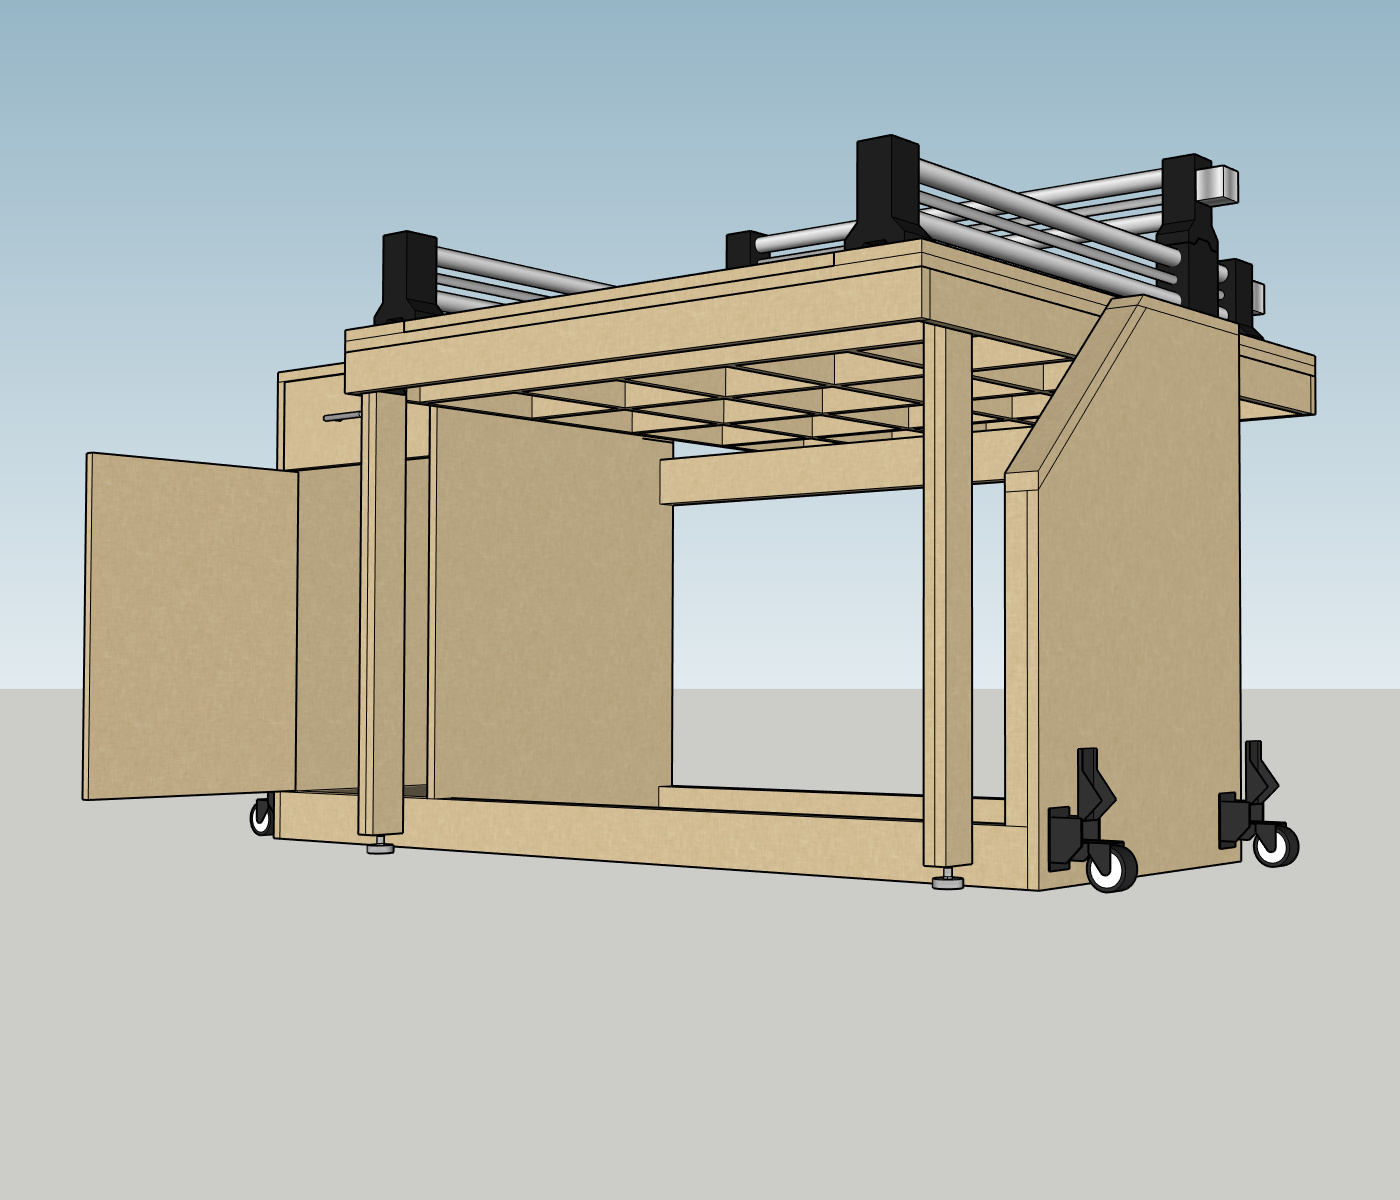
A kitchen island - CNC workshop style
Dimensions: about 140x140cm floor surface, and roughly 100 cm high.

The table top can function as a regular work bench, thus hold machinery such as mitre saw, drill press, etc while still plenty of space remains for manual tasks such as sanding, deburring, drawing, assembly, you name it.

Underneath the top, there’s a second level, on which the Onefinity would be mounted. The underside of the tabletop can be covered in sound-absorbing foam. The sides of the enclosure can have doors with plexiglass. Both the foam and the doors should reduce the noise. The glass doors allow one to see the machine, but keeping the dust/chipping at bay. When kneeling in front of the table, the machine should be easy enough to reach, maintain, replace spill boards, clamp in your work piece, and so on.

The remaining space between the Onefinity and the floor could be used for storage, e.g.
drawers with bits, tools, clamps, and perhaps even a dust extraction system.

The solid cube shape should provide plenty of rigidity - perhaps more so than a table.

Once my PC returns from the repair shop, I’ll be able to make a 3D model. But more importantly, I would immensely appreciate your feedback, tips, tricks… Any and all input is welcome.

5 Likes

Sounds like a good idea. If you’re using dust collection you would just have to figure that out and have enough overhead space

That is indeed a good point to keep in mind. Thanks. :slight_smile:

Here is a table I made for my X-Carve which folded up and accommodated a smaller space.

Folding CNC Table/Platform

9 Likes

You could put the CNC on a piece of MDF and winch it up to the ceiling, and have a fold out table below for when you want to lower it down.

1 Like

I’m just starting to learn about CNC’s, has anyone thought of making a table with a drop out portion that would allow for end grain milling for jointery, etc?

I currently use a Shapeoko which allows for end gain over the front of the table. I like doing simple dovetail and finger joints using the CNC so a cutout of some kind is a must for me. However, I will integrate the cutout into the field so I don’t lose any of the cutting dimensions.

1 Like

So, just to picture this concept… Would that mean that one of the waste boards can be removed, and there are vertical clamps / vice underneath?

I do not currently have a cnc but have seen images of this done two different ways, the first was a small portion of the waste board was removed and there was vise underneath and the other the individual had a larger machine and the waste board was on a hinge near the front of the machine to allow for different angles. I would be curious as to how Ken set up his since his since neither of the examples I had seen had a clear picture of how they did it.

For clarity, I’m sharing a picture of how I cut dovetails (end board) today. What I’ll do with the new CNC table is integrate it into the cutting area with a portion of the waste board I can remove in order to clamp.

I hope the picture speaks a thousand words. :slight_smile:

6 Likes

I was thinking the same somewhere in the far rear cutting area. My thought was to have a sliding wasteboard that would expose a slot large enough for the work piece and my hands with an under table fence for clamping.

After some research, I’m likely going to give up 4-5 inches at the far end of the cutting area. Based on my Shapeoko is only 15 x 15 which is really only 12 x 12 inches, with the woodworker version I’ve purchased, I have a lot to work with.

This weekend I kicked off my OneFinity workstation / folding table. It was based on Targ’s design then I’ve morphed from there. The casters won’t be here until next week, so its sitting on the ground for now.

Next part of the build will be a drawer module that will bolt onto the right of the table to house a surface for the Controller, as well as a set of 2-3 drawers to store bits and junk.

The folding component works great and the drop down legs are currently longer than needed as I bought both 2" and 3" casters to see which I like better, once I decide I’ll cut the drop legs to size.

I’ll keep posting pictures of the progress, but here is what I got done Sun/Mon.


11 Likes

Was thinking similar design but flipping it backwards so the machine would face the wall when stored with cabinets exposed and having it on casters. That way it is useful when stored too.

1 Like

Looks good. I hope you’ll consider posting plans, or at least dimensions when you are done. If you are mounting the controller on the cabinet section, what are you going to do about the wires when you fold it?
Looking forward to seeing the finished product!

Just finished up my design for a fold down cart too. Planning to work on it some this weekend.

Gotta hurry up, machine will be here in a few weeks.

10 Likes

Love the idea of these builds!

One possible concern (@Cdavis also mentioned something similar) with the designs here is that the cables to go from the controller box all the way to the far right Y rail are not currently long enough to reach from the cabinet (as shown in the 3d design) when in the “folded” position. That said, the cables should be simple enough to fabricate your own, as long as you get the right connectors. The way the cables are shipped - having the control box on the front-left next to the machine is pretty much the only place it can be installed, or within 6" or so of that location.

I just measured the far-right Y cable on my installed machine, and it’s about ~66" long. in the folded position - you’d need that cable to be more like 126" long ( 48" front edge + 48" left side edge + 30" back to control box) if the control box was mounted on the top of the cabinet. possibly different depending on where you intend to install the control box. The other Y axis cable is ~25-26" for reference, which would also need to be an additional ~70" longer.

If you flip the Y rails around, so the cables attach in the rear, you would need much less cable. Maybe would work with stock cables.

I plan on cutting the plug off (leaving ~6") then splice in an additional 2’-ish of extra wire if needed to allow for the table flip up/down. There is nothing magical about the wire, its just 2 pair 18gu stranded copper.

I found a few 2 pin Molex plug ends on Amazon just not sure which male end they used, there are a few different shapes.

Can someone post a picture of the plug up close?

Thanks!

Here you go. Photos from the end of the right Y cable, but they are all the same connector.

2 Likes