Now that I have had my CNC for roughly a month, I would like to share my experiences and pass along tips/tricks that I have picked up along the way.
Table:
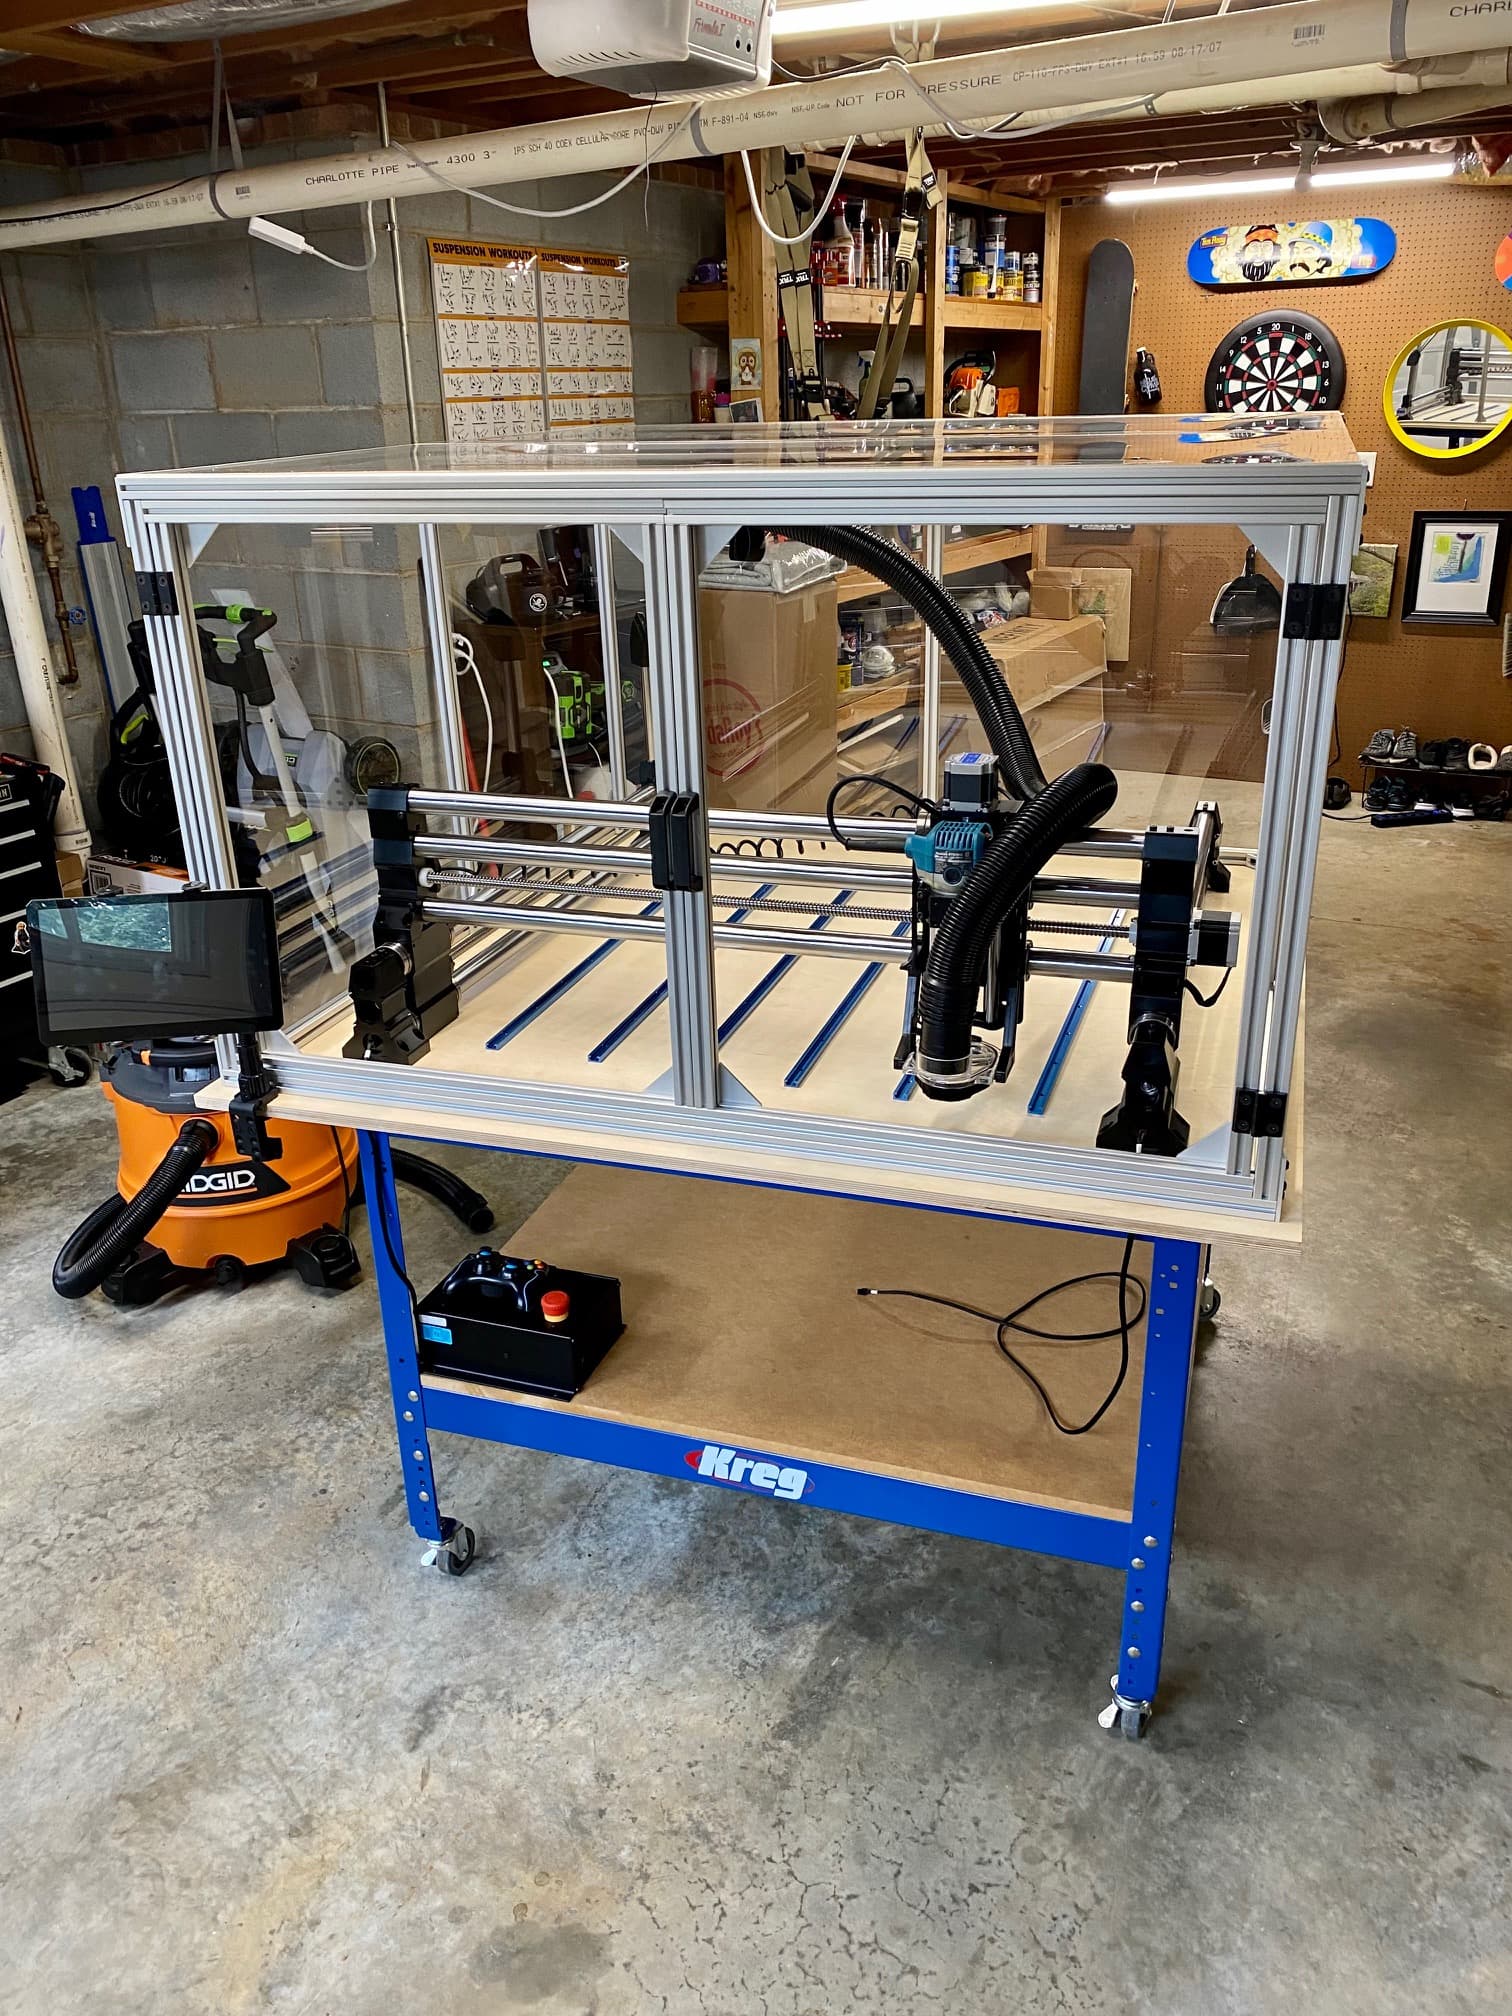
I opted for the Kreg Universal Bench (44"x44") and used 3/4" MDF for the bottom shelf and 3/4" birch plywood for the top. I installed 3" casters for mobility and keeping any eye out to see if this causes any issues. So far, so good…
Yes, they make 5’x5’ plywood! It may be abundant in your area, but it is not in mine… Call around to local woodshops and cabinet makers for leads. My work surface ended up being 54”x54”. Plenty of room for the Onefinity and its enclosure since my controller and tablet are located elsewhere. In this case, it’s better to have too much than not enough.
I planned for my controller to be under my machine from the start. If you plan on doing the same, ensure it is positioned where your cables will reach it easily. Same goes for the tablet. Keep your wiring in mind before drilling and cutting.
Enclosure:
If you have a woodshop and a legit (not a shop vac) dust collection system, don’t worry about it. If you are like me, trying to make it work in a garage/basement with nearby neighbors, build an enclosure. The noise reduction can be significant, and it keeps your area nice and tidy.
I built my enclosure with 10 Series aluminum extrusions from tnutz.com. Everything was cut to size, easy to order, and delivered much faster than expected. Other options are available, but this company has been added to my favorites.
Keep access in mind. I have two doors that open in the front and can access my entire machine with a little finesse. If I were to do it over, I would also add doors at the back of the enclosure for easier access.
Plexiglass is expensive! If this is the route you plan on going, keep your panes under 24”x36” and the prices shouldn’t break the bank. Yes, you can drill and saw through plexiglass easily without it breaking. A quick google search will help you here… I cut all my plastic with a circular saw and installed a blast gate with a hole saw and drill bits.
If mounting your tablet outside of the enclosure, make room for the doors so that you aren’t rearranging things every time the door is opened.
No matter what material or design you use, plan carefully. What accessories do you want and how will they fit into and/or enter your enclosure?
Accessories:
A good vacuum or dust collection system is a must. If you are running a vacuum, consider running it with a bag or dust collector. The dust collector is a good option, but the suction is less than desirable. If you’re not worried about shelling out a few bucks for consumables, get the bags.
I am running the Ridgid HD1600. It will suck your shirt off if you aren’t careful! It is affordable and perfect for my current needs.
Buy a 2nd router. They are $75 on Amazon, just do it!
RowdyRoman and Route1WoodDesign put out some solid products! They aren’t the only ones but the X&Y Drag Chain Setup from Route1WoodDesign is a must have for cleaning up your wiring. The Vacuum Boom and Z Clip from RowdyRoman are also must haves to keep things running smoothly and efficiently.
Buy a decent set of calipers! This will make life much easier!
Software:
Fusion 360 is a BEAST! It is very powerful and overwhelming if you are new to CAD/CAM. After fumbling around in Fusion 360, I eventually switch to VCarve Pro. Don’t get VCarve Desktop, it limits the size of your job.
Fusion 360 might be for you and it is free for personal use. I plan to return one day but for now, I am happy where I am at.
VCarve is great for seeing what your project “should” look like if all goes well!
If you don’t already have it, get the Feeds and Speeds spreadsheet from the Onfinity FB group. This is a life saver if you are running the Makita RT0701!
Materials:
Practice, practice, practice. Every time I touch my machine, I learn something new. However, wood is expensive so practice on more affordable wood types, so you get it right on that $40 board of walnut.
Get on Craigslist and FB Marketplace to find local lumber deals. If you are able, consider milling your own boards.
I can not say enough about tape! I have taken this route for securing materials to the wasteboard but have had some growing pains along the way. If you use CA glue and painters/masking tape, use an accelerator, and opt for a thicker consistency. If using double sided tape, at least double layer each strip for best results. Pay attention to boards that are warped or cupping because these methods don’t work well when there is minimal contact.
Bits:
Buy good bits! I use Amana but there are several options. Do your homework and make an investment.
Wasteboard:
My wasteboard is comprised of five 3/4" MDF strips with 3/4" dog holes and seven t-tracks. Dogs and t-tracks have their pros and cons… I thought I would use my t-tracks way more but find myself using my dogs regularly to square projects and add a little extra holding power.
My MDF strips are secured to my tabletop with countersunk bolts. I feel this will add life to my tabletop when changing strips. If this is for you, keep your bolt placement in mind if you mounted your controller on the bottom side of your tabletop.
I’m running a little long but I hope something here is helpful to somebody. Any advice or recommendations is greatly appreciated! Don’t want the blind leading the blind here…
See below for a few pics I took while getting things up and running.
The enclosure is 52"x52"x30". My tabletop is actually 54"x54", leaving 1 inch on each side for you to adjust as needed.
I was looking to get a router to knockout some quick edgework and made the decision to get the same router incase it is ever needed. Low and behold, I had some issues and swapped them out in no time. It has kept me up and running while I make an attempted repair on the other one. Word of advice, if you can disconnect and reinstall the power cable very easily. This will keep you from cutting zip-ties and rerouting cables…
Not the prettiest depiction but this should give you a better understanding of the lengths of each extrusion and the panel sizes. The panels may need to be shaved down a bit and 8 corners need to be notched for to account for the picture below:
@Tanukizilla , thank you for all the great details. Thanks too for the tip on using Tnutz, their prices are far, far more attractive than others I have seen.
I am investigating making a rotating table for storage footprint and have been looking at 80/20 vs. steel. Tnutz would make it mighty easy vs. fabricating a steel table.
Thanks for the great information and such good detail. This is a learning experience for all of us and no such thing as too much information. Thanks again.
I’ll add a few things. I use a 80mm spindle vs a noisy router so bear that in mind. First Fusion 360 has a lot of YouTube videos, beware. Fusion automatically updates it’s software (at least if you are using the free version) and they seem to like to make big changes. What this means is that video you are trying to learn from may have been done using an older version so, for example, when the person says “CAM” it’s now called “MANUFACTURE”. So try to look at the date it was published, newer is better.
You really want a dust collector over a vacuum if noise is going to be an issue. For that reason a spindle is also worth it over a trim router. You don’t really want great suction, you want to move volumes of air. That means avoiding reducing the size of the hose. I’m using a 1hp Harbor Freight cheapy with a 4" hose directly to a dust boot I got of Amazon and it removes everything. No dust, no small chips, nothing is left behind. I had to trim the back so it would clear when the Z axis would go up but it’s made from PVC so it’s not hard to modify.
As for the table, make a solid table and just a simple flat board for the top. Don’t get fancy. Once you have your 1F then you will understand much better what will work for you and how large to make things like an enclosure. The temptation is to get it done while waiting but unless you’ve had a CNC router before what you think your workflow will be may not actually be what you find works for you. My plan was a full enclosure yet with the spindle and dust collector it’s not needed (for noise or dust). The money I would have spent on an enclosure more than paid for the spindle.
This is caused by the common assumption that a URL like it is found in the browser’s address bar is an universal link. It is not. On many sites, it is customized for the user, the language, the country, the search topics the user entered before, your friend’s hair color and your dog’s food preferences. Mostly people copy and paste the link like it is:
…and believe that everyone else who’s clicking on this link will be shown the same page. But when you are someone else, with another language, another country, you may be shown completely different things.
If you intend to post a link to a specific article on a specific site, you must know how it builds its pure syntax, which in this case would be:
https:// www.amazon.com/dp/ (… and then the ASIN of the article),
like this:
https:// www.amazon.com/dp/B07FRLZ9H3
If you build up the link like this, and omit the unnecessary rest, everyone in the world will have success following your link! Like this:
I originally drafted this to get an idea of what materials were needed and what cuts had to be made. Looking back, I would change the sides and back to fit 24"x24" panels. This will reduce the height but, using wider extrusions will allow you to keep the length/width 52"x52". This would also make finding affordable plexiglass much easier and reduce the number of cuts.
Whatever you choose to do, don’t forget to account for the space inside the extrusion.
If you have any other questions or need help, let me know.