Nate,
Thank you for the link,I am working on the torsion box. I’m working on that table 49x61 and realizing how much floor space this unit requires. I am planing for 30” of ope flor space around the sides for access. That means 10’ x 6.5’ (65 sq.ft.). Wow. 
That is a fantastic build, are you going to sell the plans, to us less talented people? I can build just not as good at designing. 
Thank you for the kind words @SafetyDan - you’re too kind!
I have to admit, I didn’t make any formal plans other than some doodles and some math. Earlier in this thread, I listed a rough materials list and I’d be happy to answer any Qs you might have.
The Fisher’s Shop Mobile Assembly table looks functional, but there’s a huge amount of material in that build.
By my estimate there’s ~ $400 in materials: 5 sheets of C-face plywood @ $50 ea, 8 4’ T-tracks @ $16 ea (the cheap stuff!), drawer slides - 4 pairs full extension slides for ~$60, 6 heavy duty casters, some black pipe and fittings: $20. A gallon of glue  ($18)
($18)
-Mark
Simple 2x4 frame and legs, torsion box top covered in 3/4 mdf. Measures 53” deep x 60” wide. Still have to make Mitz’s enclosure, mount the dust collection arm, and build the spoil board system. Three weeks to go!
Mark, you are correct, it is an added expense. One that I budgeted for when I made my purchase.
The Fisher Cart is great for me as I have a 6’×7’ area to keep all my tools. Excuse the mess in the photo. But I have a rolling table, a dust collection cart on steroids, a Fisher flip cart with a planer and sander, and my jobsite table saw and track saw stacked on each other. I need to get a better picture of the pack and setup but it work for me.
Bruce Ulrich posted a video on Youtube and free plans. It is an easy design to follow. Gives you plenty of room.
I agree if one has got the $coin, go for it - can never have too much shop storage! (Your shop is as crammed with stuff as mine).
But it would be helpful if these build videos laid out an idea of the materials and costs involved up front. I have yet to meet a woodworker that has a truly unlimited budget.
-Mark
I’ve built a couple of projects from Drew Fisher. All very good with great instructions and cut sheets. I’ll be building this one as well. Most likely with a tweak or two.
That is very true, I also get they need to make money to continue putting out content, if that is a source of income for them. So some do that so you’ll purchase the plans. Drew Fisher’s plans are very good at breaking everything thing down and get a estimate of the project. Of course your mileage my variey. Like I use baltic birch from a local supplier. A 3/4x4x8 sheet is $39, much cheaper than the big box. I also just scraps from other projects, so im only in $300 this build.
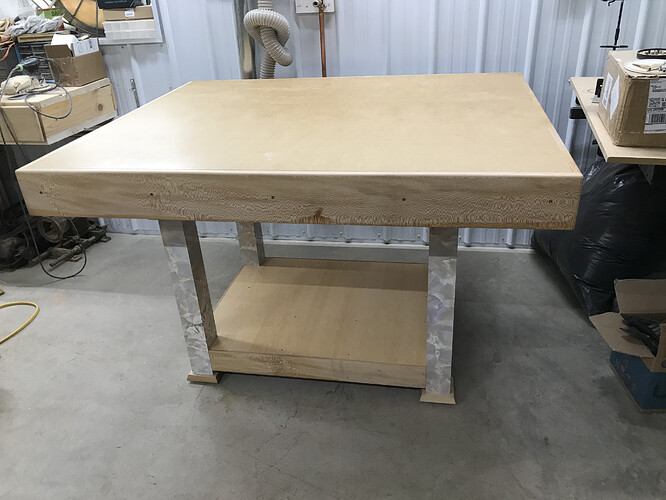
Some of you said no need to put a layer of marble in the table. So I put the table on marble columns😀. The table top is a torsion box with 1/2 ply on the bottom and 1.25 particle board with 1” mdf on top.
I am still thinking about adding something maybe a drawer (s) or a cabinet. Any ideas?
Can anyone guess what the wood wrapping the top and apron is ?
Table is 51” x62” and 39” high.
Where can I find the bolt/screw pattern and mounting foot print for the 1F ? I want to elevate the mounting 4.25" to allow for carving thick stock like 4x4’s and 6x6’s.
I understand that the maximum Z travel is 3.5 inches so I plan to add a 3.5" plus .75" on top of bench allowing for a total of 7.75" clearance from the bench surface.
I plan to have a removable waste board (4.25") when thinner material is carved.
The carve able area is 32x32
Scroll down to page 15 for the schematic. Hope you can post some pictures when it is all done. Like your idea. 
Thank you for the prompt reply. I get my machine in April so I hope to have things ready when it arrives.
I will share pictures for sure.
The spec sheet says the Z axis is 5.25 so that gives 9.5 max.(less the clearance for travel above the work)
Dusty Dave,
Awhile back I had a restricted space shop and set up my torsion box assembly table so it also handled quite a bit of storage. It had cabinets facing in each direction underneath. In addition, the torsion box was constructed so it accommodated drawers around the perimeter of the box assembly. Rather than a band enclosing the sides of the box, I had a row of drawers that held a surprising amount of stuff in a fairly organized way. Food for thought.
Jim
Jim,
That is a idea. The drawers in my torsion box would be about 7” wide an 6” deep. I wish I had planned for that the cabinets facing each way with and without drawer is very doable for me. Great suggestions
Thank you Dave
Dave,
You bet. Glad to help.
Jim
Could someone please tell me the LxWxH dimensions of the control box?
I want to mount it on the side under the table. If I drill through the table… how many inches away from the OF rail will the standard cords reach?


