Tramming Y Axis - Not understanding

Greetings

I spent the entire day Saturday trying to tram my Woodworker. I eventually got it close but it isn’t pretty.

First, it is mounted on a torsion box that I have confirmed flat. Also, I made sure the Y-rails had no twist when they were installed. Plus, I have verified square as far as the mounting of the Y rails. I surfaced the spoilboard as well.

I made a tramming jig with a 1/4" rod, a 12" piece of angle aluminum and a dial indicator.

Side to side was easy enough… although it is a bit disconcerting that natural fall of the Z slider is quite a bit clockwise from plumb. I had to turn counterclockwise almost to the extent to get it right.

Then I tried the Y axis. I didn’t know about the tramming bolts at first so I started adding aluminum foiil to the bottom of the Z slider mount. (Mine is tilted foreward.) It took 30 pieces!!! I estimate that is about .03"!!!

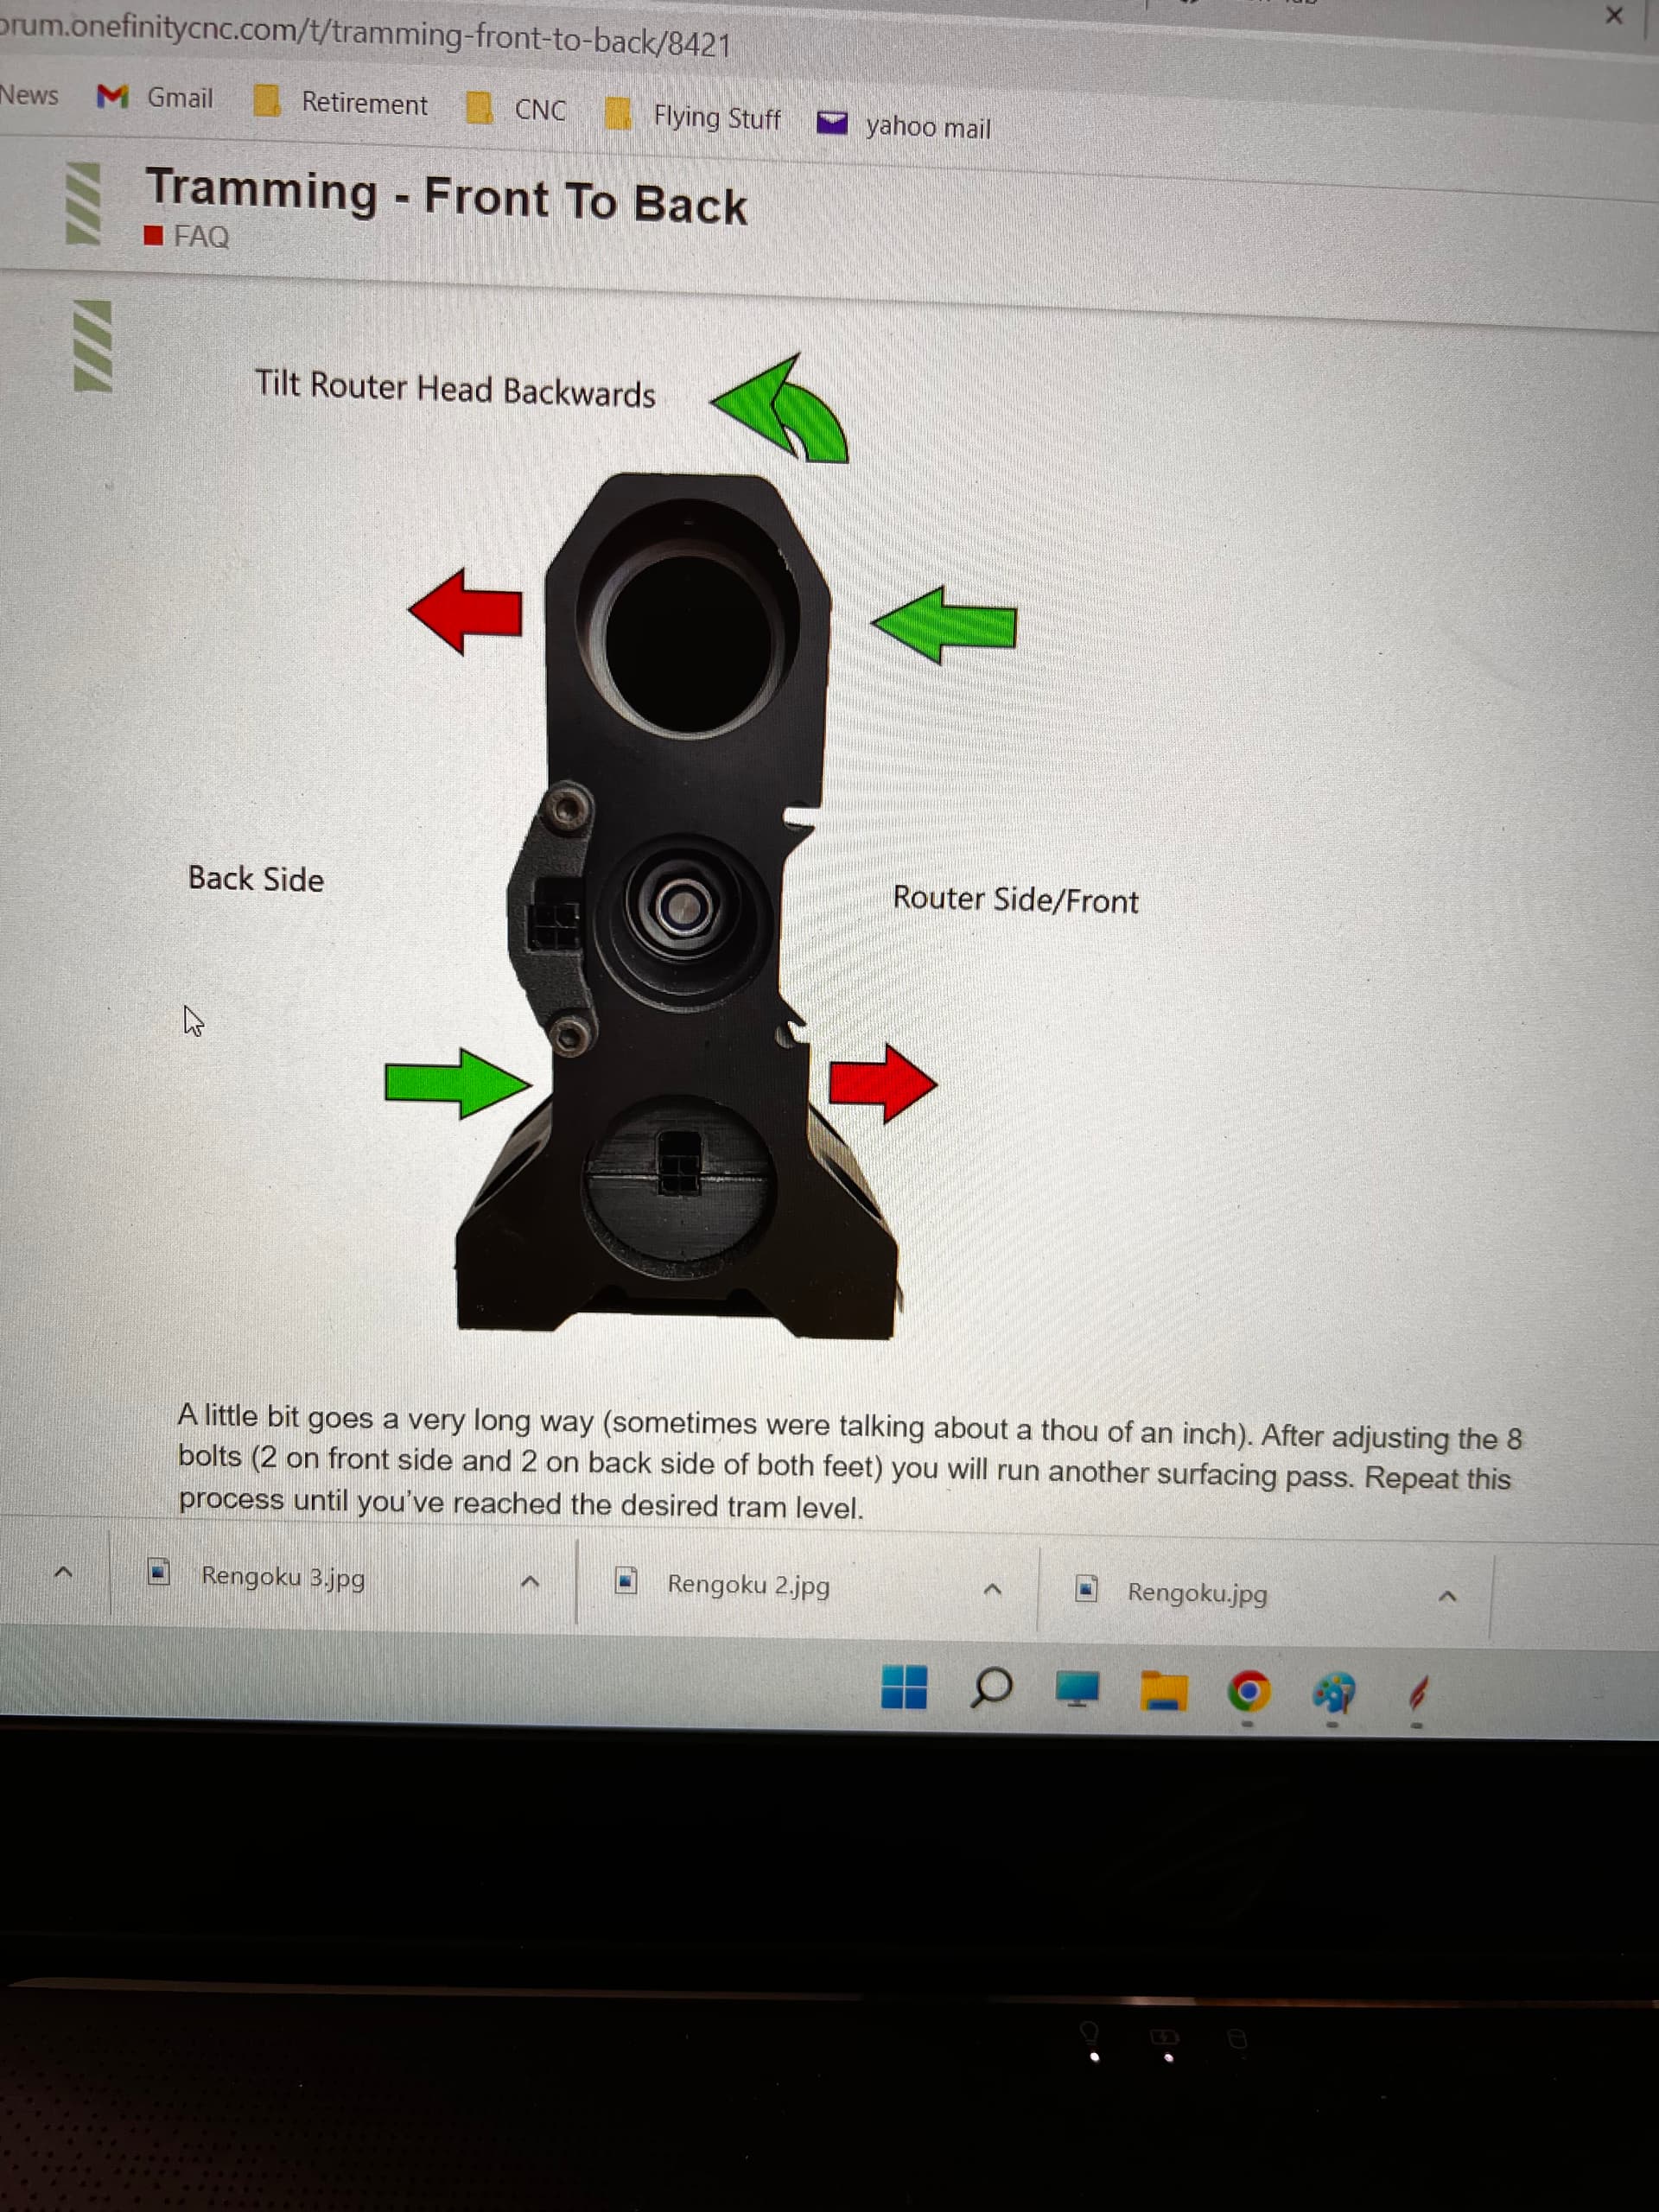
So I came inside and checked the forum and found this: Tramming Front to Back

My first thought was, “Fantastic!!” So I went outside and removed all the foil and started over. I first tried just loosening and tightening the tramming bolts (As per the instructions) 1/4 turn… but it didn’t seem to do anything. Plus it seemed as if the top bolts were almost all the way in already.

Then I tried just continuing to tigten an loosen as per the instructions. I can’t remember if it did much but certainly not enough to make up for the .03" of foil. I do know that I had the dial indicator Zeroed and the only movement I saw was from the natural rocking of messing with the machine. It almost always came back to where it was to begin with. (There is some flex in the tramming tool so I didn’t expect perfect.) I ended up tightening to the point I was afraid the aluminum would strip.

So I loosened all 8 and tried to start from a neutral position. It seemed like they were just going in to a certain point and stopping… like tightening a bolt. Discretion being the better part of valor… and ignorance hanging over my head like a storm cloud, I gave up with the tramming bolts. I just snugged them all back up and put the foil back in place.

My biggest problem is ignorance. I can’t see how these bolts are supposed to work. What are they pressing against? It looks like they are coming in at the top of the rail… but I can’t be sure. I don’t see any room for movement where the rails are mounted to the feet. The rails appears to be bolted in directly. And even if the rails are eccentric, I don’t see how twisting the rails would make a difference since there are three (Including the stiffy.)

But I do know that 30 pieces of aluminum foil seems excessive and that evidently the tramming bolts do work because I read about their usage from other users.

I called myself following the instructions to a T… Can anyone explain how these tramming bolts work or what I am doing wrong?

Once again, thank you.

1 Like

Hi Ziggy,

I recently ordered the Journeyman and have not experienced tramming
yet. There are lots of comments and such about tramming here: Search results for 'tramming' - Onefinity CNC Forum
Hopefully you will find your answers.

Cheers,

Neil

1 Like

Hi
I feel your pain. I finally succeeded with a few different approaches. My steps are included in this very long thread: Tramming the Router

Ultimately it was definitely worth the effort.

Good luck.

2 Likes

Thanks!

I found that thread earlier and saw where you were working with the tramming bolts but the thread kind of went in the direction of tramming tools and I didn’t continue.

I scrolled to the bottom and found that you ended up shimming with a .02 shim. Mine is .03 so maybe this is normal?

I haven’t read the entire thread but can I assume by the fact you used a shim that the tramming bolts didn’t work for you either?

The reason I didn’t use the tramming adjustment bolts was I felt the documentation was too weak and there would be trouble getting back to a known setting. With shims, it’s easier to add/remove and measure one thickness. I do like the idea of the adjustment bolts, just not confident I would get it right.

2 Likes

Hopefully Onefinity will shed some light on this. I wrote an email on Saturday but evidently closed the email client before it sent. It did get to them on Monday.

I hope they respond… but again. I know they are busy.

I experimented with the tramming screws and found by loosing one side completely out then tightening the opposing screw on the same rail I could get about 0.010" of movement but as soon as I tightened the first screw again it would return nearly back to zero. I didn’t want to leave one of the screws loose to achieve the result and potentially introduce error to the machine. I tightened all of the tramming screws and did the same as @mwaddellus with shims between the Z axis backing plate and the X gantry block.

3 Likes

Thanks for confirming what I found. I really thought I was doing something wrong.

Again, hopefully Onefinity will let us know what’s up.

I’m having the same issue. Did you ever get it figured out? I’ve tried numerous times and can’t get the bit to move AT ALL. The Tramming bolts aren’t doing anything. I’ve been using it with well over 30 pieces of foil to get the spoil board without ridges but noticed the ball screw is rubbing the foil.

  1. What am I doing wrong? I’m guessing OF isn’t posting a how to video because it isn’t effective.
  2. If I must shim where is the best place to put them? Can I put them under the front of the x-axis feet or keep them behind the z-slider.
  3. I’ve got left to right dead on. Now it’s just figuring out how to brig the top of the end mill way forward.


It would be very helpful if @OnefinityCNC could describe the internal mechanism of how the tramming bolts work. I was able to improve my forward nod (same as @G-Stibor is showing here), but still have sizable ridges in my spoilboard. Im going the shim route also, but sure would be nice to avoid that. Seems like it might effect the strength of the connection between the z-slider and the x-slider.

There’s a pipe inside the feet. The bolts push the pipe forward or backward (we’re talking minute increments). Top bar forward or backward, bottom bar the opposite way to tilt forward or backward, just like the faq describes.

2 Likes

Does the bolt push directly on the pipe? Or is there something on the tip of the bolt?

the tip of the bolt pushes directly onto the pipe.

This is helpful! I’m assuming that pipe the screw is pushing on is the hardened steel rails? Or is there another connection inside there?

yes, that is correct.

1 Like

Thank you for jumping in and verifying @OnefinityCNC ! With that knowledge, I’m going to try the tramming bolts again, but this time I’ll actually try to budge the x rails to get the right position before re-tightening. Would be great to avoid shimming stuff.

1 Like

Okay, that makes sense. So, even though I have the bolts completely bottomed out and tight the movement is so small that I will still have to add 1/8” worth of shims. Is there an optimum place to put them that will keep the machine steady?

Be aware that when tramming with the tramming bolts, this is best done from both ends of the travel, individually. If done from the center of travel, you may achieve a perfect tram @ that specific X location, but may be out of tram at the ends of X travel.

4 Likes

Did you end up shimming the z slider, @Machinist? Confirming that I did this at both ends of travel the 1st time around and will again.

I’m willing to bet this is less of an issue on the smaller machinist version of the machine. True?

1 Like

Yes, probably true, especially since mine is built on an aluminum extrusion frame structure with flat steel top. I originally had mine shimmed at the top of the Z slider, but once I learned about the adjustment screws I was able to remove the shim I had in place.

1 Like