Is this normal? It’s driving me absolutely crazy and I feel like it’s making my larger cuts crooked by 1/16th to 1/8th. I’ve attempted to cut some larger pieces [24x48] and both have came out slightly crooked so that’s why I’ve tried to re assemble and tram my machine. Any tips or reassurance would be helpful! Thanks


Is this normal? I’ve noticed when the machine homes it does this on the front side and that seems normal but after sometime the machine will go all the way back on one side and not the other…
After doing some research and banging my head against the wall for several hours I think I may have fixed this issue by turning off the machine and loosening the bolts on my X Rail and then pulling all the way back flush. I think the bolts on the left side rail were a little over tightened this time around and it was causing the left side to pull back after homing the machine. Prior to this I checked to make sure everything was square and everything checked out. I also watched the stall homing video from onefinity and changed the stall current on my Y axis but that didn’t help with the issue. Now I will be reverting back to the default setting tomorrow and I will check again to see if the issue has been fixed. [crosses fingers] Will follow up if the issue is resolved!!!
Kevin, I’m only seeing 1 screw holding the feet down. Did you only put 2 screws in each one? It appears to be a smallish screw at that. It’s really an important assembly point to have the machine secured down with 4 large screws at each corner. Think about the mass of the gantry when it’s traveling along the Y axis. Now think about all that mass traveling fast, and immediately changing directions of travel. All that inertia is transferred directly to the machine feet. So if they’re not seriously secured, it will cause issues.
Hey Bill, thanks for the quick reply! No worries, that’s a very valid point and I definitely make sure to always have four screws in each foot. These were the screws that actually come with the machine but the picture probably makes them look a lot smaller from that angle. I started to take the machine apart to realign and square everything once again but I remembered to snap a picture before I went any further. I had surfaced a fresh wasteboard earlier in the day so the machine was quite dusty and in need of some much needed cleaning. I originally was thinking maybe from all the dust with mdf I might’ve had a dust buildup that could’ve been causing an issue with the alignment. I did manage a quick cleaning before setting everything up again to make sure that wasnt an issue and that didnt seem to be q concern. I still need to clean those ball screws now that I think about it and add some 3 in 1 just to keep everything up and running smoothly. I’ve had my Journeyman for about 8 months now and I’m really impressed with the machine but I have been going crazy trying to figure out why it was off on my last few projects. I’ve been trying to pick up some more business and I really need to get this thing dialed in because I almost ruined a few nice pieces of wood in the process. Luckily I was able to salvage most of it and repurpose the large sheets of plywood that come out slightly crooked. Hopefully with my new microjig system for the wasteboard and clamps, plus adding some squaring points and a fence, this will help me keep everything nice and straight if the machine is not out of square. I’ve been using tape and a large grid but I had some doubt with how that would work out long term with some of the large projects I need to produce. Later today we will try to accomplish the wasteboard and post the outcome. Thanks again!
No problem Kevin, glad to help wherever I can in spite of no longer having my 1F machine. Understood on the pic you snapped in process of tweaking things on the machine. I still check into the forum occasionally. There’s a level of intelligence and professionalism in this forum that I don’t see in many other forums or FB groups of the cheaper Chinese machines.
One of the issues with the 1F is that the way the machine is built, it’s fully capable of extreme accuracy. But the average hobbiest that has one lacks the deep understanding of machinery setup and the mechanical aptitude to fully comprehend the ground-up concept of setting up the machine accurately. Although most experienced woodworkers, by virtue of the fact that they are woodworkers (which I’m not), have some level of understanding of this.
Please understand and let me clarify: this is NOT intended to convey any disrespect whatsoever to yourself or any other forum member here! This is an ongoing learning process. These are just things I’ve learned over decades of work as a machinist, tool designer, and doing jig setups and dimensional confirmation at various Toyota North America plants. From a pure machinery standpoint, I can only compare it to putting an insanely powerful supercar in the hands of a 16 year-old who just got their license.
The only reason I have a CNC machine is because of my understanding & love of anything machinery related. There’s something very geeky about knowing I have a very capable and accurate (albeit small) CNC machine in my micro-shop. Most of my projects are related to plastics, composites, aluminum, etc. To borrow a tagline from Lexus, my 1F as well as my current machine have become an obsession of “the relentless pursuit of perfection”.
You were spot-on correct in checking for dust build-up on the ends of the bearings, which can and will have a direct impact on repeatable and accurate homing. That said, I always recommend installing hard-stops on the X and Y axis. These will lose you about 1mm of overall travel, but should help ensure more repeatable homing while minimizing the effects or concern of homing against compacted wood dust. I don’t have the link to what I used for this, but I hope @349iq2345 will check in here. Not only is he one of the most intelligent, knowledgeable people I have ever met, he also has bookmarked many commonly referenced topics on the forum.
Hey Kevin,
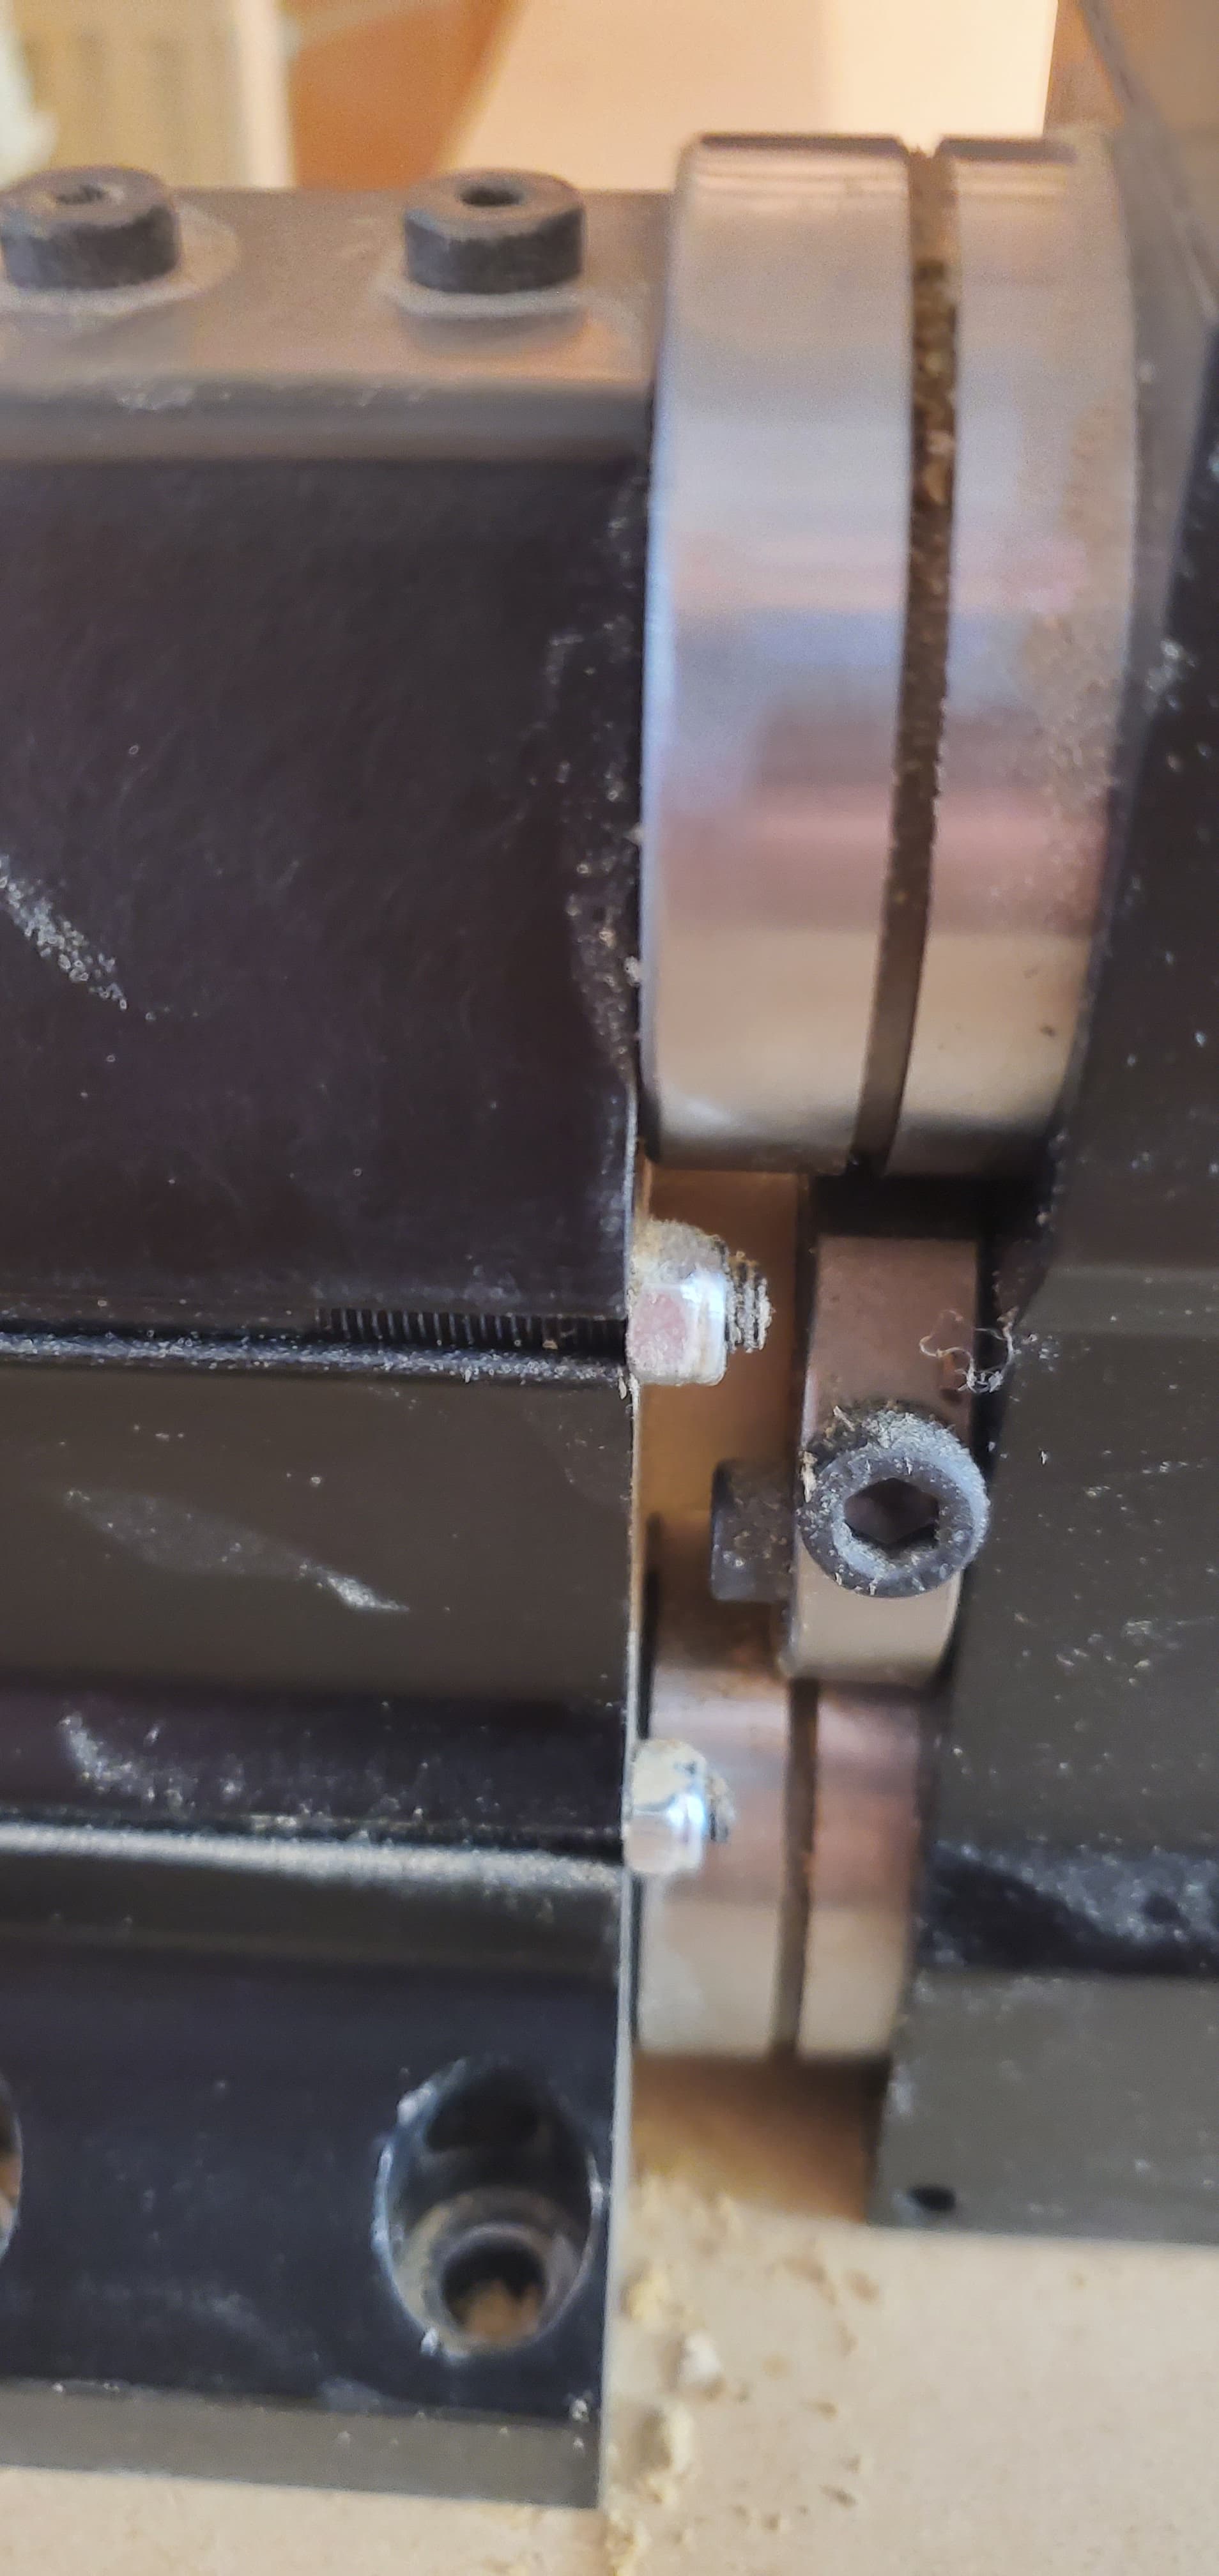
- If your machine after homing shows a gap between the linear bearing (the big chrome-plated cylinder that sticks out the Y carriage) and the black front foot block on one Y side, but not on the other, l would first check if the distance with which the linear bearing sticks out of the Y carriage towards front is the same on both sides (same on left Y carriage as on right Y carriage).

Image 1: One of two linear bearings used in a Y carriage.
They are held with grub screws and it is not impossible that they are not equal.
→ If you finally measure the “gap”, don’t measure this gap, i.e. measure not from linear bearing to black front foot block, but from (black) Y carriage block to black front foot block. (by the way, one of the purposes of Bill @Machinist’s homing stops is that on stall homing, it bumps against carriage block and not against linear bearing)
-
Did you already check your machine for rectangularity, like → described here? If you didn’t yet, please do it now. If then still there is a different distance between (black) Y carriage block and (black) front foot block on one Y side than on the other, you can do this:
After you ensured that both diagonals are perfectly equal, then you can do the following:
- Shut down the CNC controller.
- Disconnect both Y stepper motors from the controller.
- Loosen slightly the four bolts on the top of every Y carriage that attach the X rail to them.
- Move both Y carriages towards front until they both touch the front end.
- Retighten the eight bolts.
- Restart the controller.
Thanks @349iq2345, I knew you’d come through!
Greetings to you, too! Hope all is well in your corner of the world. We’re still ‘enjoying’ 110+ deg (f) temps in AZ. ![]()
Hey Bill,
I’ve been feeling guilty all week, the world is getting grilled and I’m sitting here at 18°C *9/5+32 = 64.4 °F and raining ![]() I even turned on the radiator yesterday
I even turned on the radiator yesterday
Hey Aiph5u,
Wow, that sounds SO refreshing right now!! ![]()
Hey Bill, No offense was taken whatsoever! I do understand that in most cases the machine isn’t at fault but yet its user error from lack of experience, overlooking something by accident, or even frustration. Not to toot my own horn here, one of my best traits in my opinion is my patience and my ability to stick through any adversity with problem solving. Some people do tend to give up easily or become rude, nasty, and flat out unprofessional. If I have a mental breakdown its usually in my own space… :] I might have a few words with myself but, I do not give up or take out my stress on others in online forums. Whenever I just have a bad string of things not working out, I usually step away for a few and give it another go when I’m focused and thinking clearly.
With that being said I truly appreciate, respect, and value you for taking your time to share your knowledge and experience with not only me but others in the community. Thank you for recommending the hard stops!! I purchased a set right after reading your comment. I do tend to seek perfection and that’s the main reason I just couldn’t let the issue slide [no pun intended] until I get this thing dialed in. I’m no professional in the CNC world but I do value solid advice and criticism from others more experienced than myself. The best way to gain knowledge is by making mistakes, solving problems, and learning from it… Taking advice from someone more experienced than myself is a luxury I don’t take for granted. I’m happy to have you both in my corner!
I do believe my issue was user error and I’m hoping I’ve fixed the issue by adjusting the over tightened screws on the left side of the X rail. This side seemed like it was a bit tight compared to the right side so I fit them both just snug in place. This was causing the left side to pull forward slightly after rehoming the machine. My first attempt at setting up the machine I didn’t have the issue in the front but on the backside as stated. After removing the bolt on the X axis, the Y axis slid right back into place with no issues. I turned the machine back on and it was aligning perfectly everytime I homed the machine. Prior to this, I did check for square by measuring diagonally corner to corner, and measuring side to side in the front/back to check for square. Everything measured correctly… Wish me luck that this resolved my issue, and I can get back to making some beautiful projects with this awesome machine!! Thank you for your time Bill and Aiph5u!
Hey Aiph5u,
Thank you for the information and the links! I was having an uneven issue as you stated above, and I did try this exact formula before seeing your post. This seemed to have fixed the issue for now… We did check for rectangularity and everything looked good. I did make some changes to the stall motor prior to adjusting the rail. We went from 1.0 to 1.5 with no correction being made. I think going back to the default and checking again is a good idea? If the issue comes back I will definitely check the grub screws you mentioned to make sure.
Thank you for your time!
Kevin, thank you very much for your kind words and great attitude and philosophy of learning to master this powerful machine. I’m very happy to help, and I can say the same for @349iq2345. I don’t know which I miss more… my Onefinity machine, or the sense of comradery in the forum.
I’m glad to hear that you ordered the stops. They are good to ensure repeatable homing without the fear of homing against compressed wood dust. I never used the 1F controller, so I always executed manual homing against these hard stops.
Wow, my Foreman is scheduled for delivery August 1. After reading the comments, I am definitely like the 16 year old that just got my license. I have never used or even heard of CNC until last year and then ordered one. I am truly anxious now, as I don’t have a clue what Aiph5u is saying, and didn’t understand the video he included. Hopefully I will be able to figure things out, and get through all the frustrations of the learning curve. It is helpful knowing you guys are here and willing to help anyway you can. Thanks in advance everyone.
Hey Bub,
some things will be better understandable if you have the machine in hands. But I would do the most research possible while waiting for the machine. Especially
-
Read the Fine manuals (PDF)
-
Browse the FAQ documents
-
Watch the Onefinity Youtube Support video channel, especially:
Are you already familiar with the CAD/CAM software of your choice? If not, mastering one can take monthes too, especially 3D model creation. You could use the time that way, since you will need it anyway, and it would not be that satisfying to have the machine here and to have this monthes-long learning still in front of you ![]()
Thanks Aiph5u,
I bought VetricPro when I ordered the 1F in March. I have been doing what I can trying to understand how and what to do with that. Definitely going to take me a lifetime to learn and use all there is to do. I have watch several videos from setting up the 1F to understanding and using the spindle. Thank you so much for the links you sent. I will be checking all of them out, and saving them so that I can refer back. Good thing I’m retired and will have time to spend learning. Thanks again for all your help. I’m sure I’ll be on here real soon with more “HELP ME” post. Enjoy you day.
Bub
Just remember, you can’t ride the Tour De France after owning a bike for one week. Take it slow. Learn the basics. But don’t get frustrated if you aren’t an expert on day 2. My advice is to download the 1F logo file (or another of the files Oneffinity has posted here. Get some cheap wood (I like scrap pine after checking for nails and staples) and make it your first project. You’ll go through the steps of loading a file, setting up the zero positions, securing the wood, and doing a carve. You know the file is good so if there’s an issue it’s either something you haven’t learned yet or an issue with your 1F that needs to get worked out. Sorry for going a little off topic.
Thank you Alex (Dr-Al),
I can’t say I won’t get frustrated, I’m already frustrated trying to learn vcarve pro. I know it will take lots and lots of time, trial and error. I’m not a quitter, but not a quick learner any more either. I know with this forum and help from people like you I’ll make it one step at a time. Thanks again.
Bub
Hey Bub,
You watch their video tutorials one by one, starting with “The Basics”? I think that’s a secure way to aquire the knowledge.
But usually as with all learning, you got to practice while learning. You cannot learn just in theory, because that’s not how the human brain works. When following the tutorials, I would execute what is shown. As long as you don’t have your machine there, it consists of doing with the software what is shown. If it’s about the CAD part = creating your virtual objects, I don’t know how good VCarve Pro is, as they sell Aspire for more 3D creation capabilities. I would always learn the CAD part (= creating 2D and 3D objects) first, and separately, e.g. with Blender as linked above. Blender is free and open and has excellent tutorials.
Regarding creating the CAM part = creating the toolpath, for the milling step, which you can only execute on your machine, so of course real progress may only come when you have your machine.
I would read the docs and the FAQs though while waiting for the machine.