Onefinty control panel remote (gamepad replacement with lots of extra options)

I’m old and have a few pennies left in the bank after paying for the Journeyman. After learning the potential cost, I am still interested. Especially in the completely assembled and tested unit. We are starting with a Makita, but bought the Journeyman with a spindle and VFD in mind. Anything you can do to ease the integration of a VFD and spindle will be appreciated.

Jim

2 Likes

Would love to be a part of this. Very nice

Count me in as definitely interested as well. When/how can I place an order for one of the complete DIY kits? (I don’t envision assembly being a problem for me)

On the large machine sizes it would be helpful to be able to move it left or right as needed while orienting bit position and the like. I am thinking of a rail or the like that allows it to slide side to side as needed. Your thoughts?

I’ve ordered all the parts needed. Apparently there are more than enough people interested to take that gamble of investment. Hope I have received everything early November. Then I can create 13 kits and documentation. I hope to have everything documented and thought out mid November. I don’t want to take pre-orders. Things might change. first I want to documentation ready so it’s absolutely clear for buyers what they are buying. Like that router / Spindle mix-up I made above. :sweat_smile:

3 Likes

Hey Satoer,

after thinking about what you wrote, I think maybe it would be best if you first bring out a Version 1.0, with just a router switch.

The possibilities of integrating spindle-related controls or information are so diverse that it will cost you time until it is clear what should be implemented and what is required or desired. Very different things could be conceivable. This is because there are at least three levels of access and / or information to the VFD / spindle.

First of all, everyone should be aware that the common use of a CNC machine is to run a gcode program. If you use a VFD and a spindle for this, then it is controlled by the program. This means that switching the spindle on and off and setting the spindle speed is controlled inside the program that is running (Gcode commands M03 / M05 and S). In this operating mode, there is no need for any control element on the control panel for the spindle.

But of course many users would like to experiment with the possibilities of a spindle “live”, like with a remote control, especially if they are still new and want to try things out. It is useful here that a VFD also allows extensive control by means of externally connected controls and buttons. But such a panel would have more controls than just one single switch. That would be the second level for something spindle-related that could be realized in a control panel.

And thirdly, with every VFD there are almost innumerable setting options that are not set by the program, i.e. not by standard Gcode. For adjusting these settings by hand, a VFD has a small control panel and a small display. This control panel is also available as an external accessory for the VFD so that you can pick it up and sit down and not have to stand at the control cabinet all the time when you set the VFD.

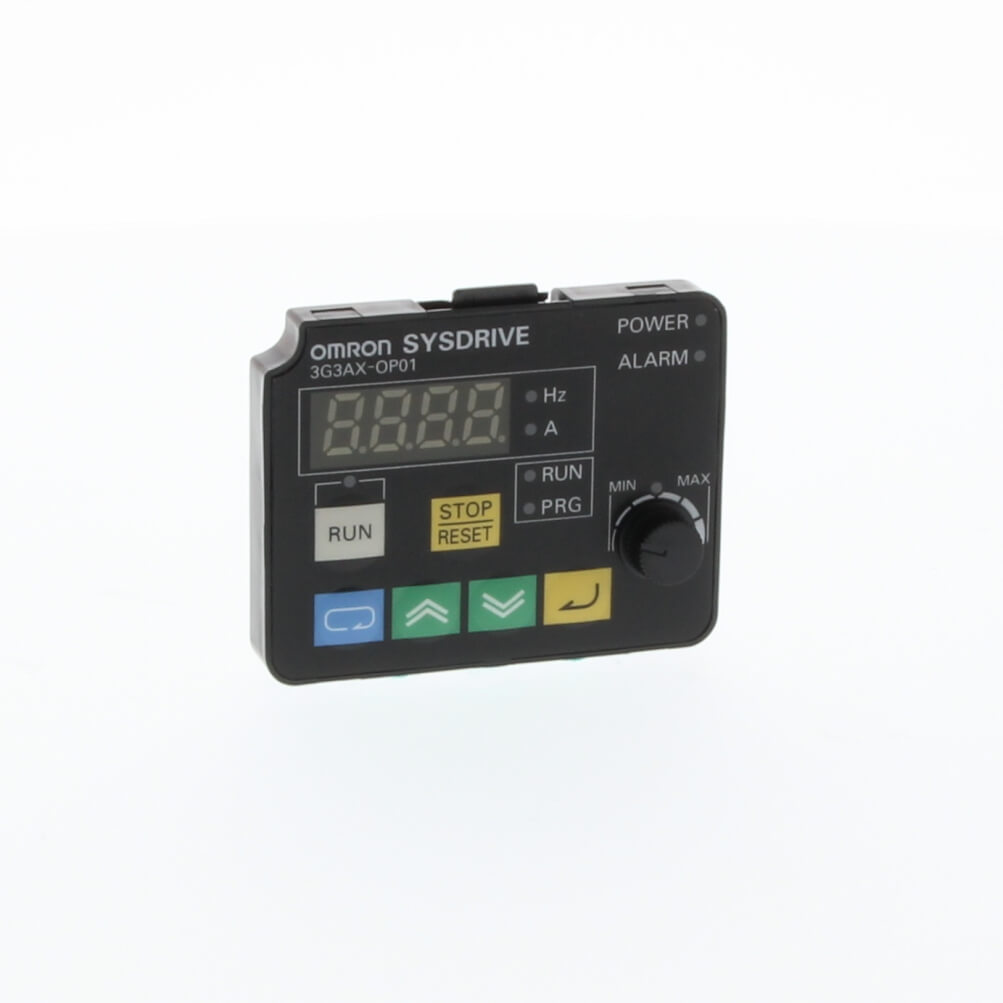
One such accessory for my VFD, the Omron MX2 (almost identical to Hitachi WJ200) is the Omron 3G3AX-OP05 “5 line LCD digital operator with copy function” control panel or the Omron 3G3AX-OP01 “LED remote operator panel” control panel. You could make an indentation in your control panel to put these accessores in there.

Much better, however, I would think (and I have already thought of doing that in near future) would be the question of whether one should recreate this, namely to get rid of these flimsy membrane keys and replace them with good mechanical switches from Cherry, Marquardt or Kailh (said to be the best) and replace the display by one in your favorite size and color.

However, level three is specific to the VFD model. I cannot say anything about the Huanyang VFDs since neither I own one nor have I ever seen a User’s Manual or datasheet from them.

Level two should offer at least some similar control or information options for most VFDs, at least setting the speed with a potentiometer would be basically conceivable.

As you can see, there are many options for taking Spindle / VFD into account on the control panel, but it is not trivial which one is feasible, necessary, or desired.

3 Likes

I understand and will be waiting for the word when you are fully ready.

Do you have a ballpark figure on the kit pricing yet?

I’m in if the price is right, but I still run a router. WIll this work with that? If not, will there be one in the future that will?

I am interested! Please let me know, I’ll buy a kit!

I’m interested in buying one as well.

Hi Aiph5u, thanks for the detailed information. I’ll let this soak a bit in on me. Right now I have no intension supporting spindles yet, but it would be great if I could find some universal way to control them.

I often use the manual control of the Makita to flatten the surface of a piece of wood. Just turn on the spindle and use the joystick to rip the top of it. Way faster than creating g-code for it. I guess I would like the same convenience if I had a spindle.

2 Likes

@satoer - you should to derate your relay by 50% when switching inductive loads - so your 20A relay only gets you 10A. Also, I’d recommend using a MOV on the load side as well. This article does a good job discussing the details. Omron also has a good FAQ on the topic.

Isn’t the Leonardo discontinued? I suppose it doesn’t matter since it’s the same footprint as the Uno.

Finally, perhaps a rotary dial for the speed rather than 4 switches - it would save real estate and a little cost.

Looking good - keep up the great work.

-Tom

Is it? It’s still available in the Arduino store:

Haven’t seen any EOL warnings. I don’t worry about it, even if it was EOL, you can still buy it for years since the design is open source and everyone can produce it. You can’t replace the Arduino for a Uno. I’ve specifically incorporated the Leonardo because of it’s use of the ATmega32u4 microcontroller. This microcontroller has a build in USB controller so it can emulate a joystick HID.

Yeah, like I said: “I would stay well below that”. 10A is still a big load to switch.


This is the relay part of the schematic. There’s a snubber circuit over the contacts to prevent sparking and electronic interference. (Top-left) If a user wants to add extra circuitry he can do so, but I think this is enough. I haven’t encountered any problems with quickly switching the Makita.

Real estate space wasn’t really a priority. The main priority was practically. I just wanted to see with a quick glance what speed was selected. And quickly pushing a button to set a speed was the most convenient way to change the speed. I agree, a rotary dial saves a lot of hardware costs. (Besides the joystick and the emergency contact, the metal LED push buttons are one of the most expensive parts on the panel, ). But I think it’s more practical than a knob that you need to turn to dial in the speed.

2 Likes

Yes

Still very interested

Interesting. This is not area of expertise (something like 30 years ago in college EE), but I thought that kind of snubber only works for DC, not AC?

Regardless, my point about derating the relay is my shop vac pulls 11.6 AMPs - a 20 amp relay properly derated would not necessarily support the shop vac. I’m sure it will work, but might have an artificially low lifecycle.

BTW - kudos for optically isolating the relays - so few people do that, including buildbotics – they feed external inputs directly into the RPI - so many bad things can happen…

-Tom

2 Likes

Wikipedia explains it much better than I ever could : Snubber - Wikipedia

RC snubbers
A simple RC snubber uses a small resistor (R) in series with a small capacitor (C).[1] This combination can be used to suppress the rapid rise in voltage across a thyristor, preventing the erroneous turn-on of the thyristor; it does this by limiting the rate of rise in voltage (dV/dt) across the thyristor to a value which will not trigger it. An appropriately-designed RC snubber can be used with either DC or AC loads. This sort of snubber is commonly used with inductive loads such as electric motors.

I don’t think either switching the shop vac would cause a problem. I’m switching my dust collector system with a small Ikea smart remote. That relay is way smaller and it hasn’t caused a problem (yet :grimacing:) But you can always switch a big contactor with it.

1 Like

Redesigned the panel. Same layout, but tiny bit bigger. Final measurements is now 257mm x 182mm (approx 10inch x 7 inch).


Also changed the gfx. It’s neater, better aligned and changed “spindle” to “router”. Any remarks?

1 Like

This looks amazing… only $.02 I can lend is on things of this nature I prefer to capitalize each word of the button labels. While proper English is great, just looks better IMO.

Oh Shit - I like Oh SHIT on that one but that’s just me. :slight_smile:
Touch Probe
Dust Collector

You already made me happy with Arm Router, but either way it looks better to be consistent.

-Alex

1 Like

Agreed. Changed :+1:


It’s also more consistent now, since “Arm Router” already was capitalized.

3 Likes